- Race Organiser Waymarkers (and why they aren’t editable by teams)
- SafeR Recommendations – Organisers’ Risk Assessment for Hazard Waymarkers
Waymarkers are used by Race Organisers, Teams, SafeR analysts and UCI commissaires to highlight important sporting, logistical and hazard locations for each race route. When Race Organisers add this information they will set each waymarker’s Level which determines if it is shared with other stakeholders (e.g. teams) or is private within their organisation.
For races where the organiser is not using VeloViewer, the teams will need to add in all of this core information themselves using the Road Book along with the integrated Google StreetView and/or recons.
Apart from waymarkers added by Race Organisers that have explicitly been set to be shared, all waymarkers added are only visible to users within your own organisation, i.e. with access to your Race Hub.
Adding waymarker
Waymarkers can be added, edited or removed in the Race Hub and the Live app (when in Recon mode). In the Race Hub the easiest way to add a waymarker is to right click on the map. Another good way to add a waymarker in the Race Hub is to use the Google StreetView integration to have have the StreetView at the exact location of interest, then press the “Add” button at the top of the waymarker list to add a waymarker at that location.
As a Race Organiser, it is very, very important that you are precise as possible when adding waymarkers, especially for sprint locations. The riders will probably be coming into those locations for the first time and will be relying on the accuracy of the waymarker’s location to time their lead-outs and sprints.
Copy waymarkers from previous year’s race (or other race covering some/all of course)
You can use the “Import” button above the waymarker list in the Race Hub to copy waymarkers from another race (or training camp) for all or part of the course. More information available here.
Waymarker types
Waymarker types are grouped into 4 categories:
- Essential: e.g. Climbs, Sprints, Pavé/Gravel.
- Hazards: e.g. Roundabouts, sharp turns, narrowing.
- Information: e.g. Feed zones, team parking, Race HQ.
- UCI: e.g. Incident, near miss.
To see the full list of waymarker types, open a stage in the Race Hub and expand the Waymarkers section. In the top right you will see a Help button. Press that and a popup is shown which lists all of the waymarker types grouped into those 4 categories. There are also buttons at the bottom of that popup that allow you to print the full list of waymarkers (or save as pdf) as well as download all of the waymarker images as a ZIP file for use outside of VeloViewer, e.g. in a road book.
Waymarker levels
Suggested use of levels for Race Organiser:
- E: Essential race info. e.g. Sprint/Bonus, KOM (HC/1/2/3/4), KOM start, Pavé/Gravel start/end.
- H1: A red hazard – Any area or situation on the course that may present an elevated level of risk to riders, even when standard safety measures are in place. Within VeloViewer, these areas are automatically indicated in red. Examples may include unexpected obstacles appearing after a corner, surfaces that are unsuitable for road bikes, sections of traffic infrastructure in the final three kilometres requiring extra caution, or sudden transitions where the roadway narrows. All significant hazards should be addressed on site, ideally with the assistance of marshals, and noted via race radio for rider awareness. For a typical 160-kilometre race, it is advisable that the number of such significant hazards be limited to approximately 5, where practicable.
- H2: An orange hazard – A potential risk that requires the attention of the race organiser. Typical examples include rail crossings, road furniture in descents or urban areas, tunnels and bridges with narrowing sections, steep technical switchbacks, speed bumps within the final five kilometres, and cattle grids. In VeloViewer, these hazards are automatically displayed in orange. It is recommended that the number of medium impact hazards in a 160 kilometres race does not exceed 15. These hazards should be clearly signaled on site and must be communicated through the race radio.
- H3: Yellow hazards are defined as any obstacle or route feature that may interfere with the smooth conduct of the race but does not constitute a high impact hazard. Examples include raised pedestrian crossings or speed bumps located far from the finish, changes in road surface, or traffic infrastructure situated on wide and straight sections of road. The primary purpose of identifying these hazards is to support pre-race preparation. This information is shared with the teams, who may decide whether or not to display it. Normally, yellow hazards do not need to be communicated via the race radio if adequate on-site signaling is in place. Nevertheless, organisers are encouraged to identify and mark all potential issues within this category to ensure thorough preparation and safe race operations.
- Info: Other info that could be useful to the Teams. e.g. Waste/Feed zones, PPO, Anti-doping, Parking.
- R1 to R6: Race Organiser only – All other features, Normal junctions, Info for marshals, logistics for signage/barriers, other information for Race Radio.
- UCI: Incidents – Available to race organiser and UCI/SafeR.
Waymarker level filtering
At the top of the waymarker list in both the Race Hub and Live app you will see the Race Organiser Level filter options. Using these you can hide all waymarkers for specific levels. H3 waymarkers provided by the organiser will offer a useful set of information for a teams planning but for the rider presentations and in the Live app during the race, the user might benefit from hiding these H3 waymarkers so they only see the more important hazards along with the racing information.
Typically teams would also add their own feed waymarkers as they will want to add staff names and set colours to indicate different teams of staff. They would then toggle off the Info waymarkers in the Live app during the race so they hide the organisers feed waymarkers.
Waymarker properties
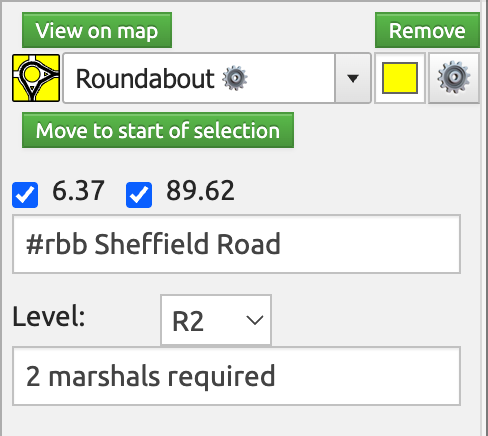
Description of waymarker properties. Note that waymarkers added and shared by a Race Organiser are read-only:
- View on map: Zooms the map to show the waymarker’s location.
- Remove: Deletes the waymarker.
- Icon: Dynamic icon for the selected waymarker type, colour and options.
- Waymarker type picker: Displays a popup that lets you select which waymarker type to use. If the ⚙️ icon is shown, it means this waymarker has options available.
- Colour picker: H1/H2/H3 waymarkers should always be associated with the provided red/orange/yellow colours for consistency across races for all users. Apart from that, use the colours as suits your needs.
- ⚙️ Options button: Opens the Options popup for the waymarker (where applicable) where you can specify more details about a hazard (e.g. roundabout direction, side of road taken and traffic island locations).
- Move to start of selection: (renames to “Move to StreetView location” when StreetView is active) You can select a section of the route on the top elevation profile, fine-tune with little red arrows, then press this to move the waymarker to that exact location.
- Distance checkboxes: If the route is a simple A to B shape, then you will only see a single distance here. But if the route passes the location multiple times, you will see multiple distance options. For waymarkers like Sprints, you will want to uncheck the distances which don’t apply. This will result in the waymarker appearing in the Live app and on rider head units at the correct distance.
- Description: Whatever useful information you wish to display for the waymarker. This description is shared with teams for Race Organiser waymarkers that aren’t internal only. The options for the waymarker are store as a #tag in the description. Removing the #tag will reset the options. You can manually type in the options #tag if you know it. A couple of useful standards for Race Organisers who are adding waymarkers to share with teams:
- Warning: (i.e. the generic “!” warning waymarker type) Should include a description explaining what the hazard is.
- KOM: Should have the climb name in the description.
- KOM start: Can have the climb name, the length and average gradient of the climb is auto-generated and displayed in the Live app automatically.
- Pavé/gravel start: The sector number, name and star rating if available.
- Railway crossings: Should list the relevant train times (useful for UCI Commissaires and teams as well as the organiser).
- Level: (Race organisers only) See above for more information ono waymarker levels.
- Race Organiser notes: (Race organiser only) These notes are not visible to teams even if the waymarker itself is visible. Use it for your own, internal use. If you use a #tag then the text after the tag will be shown on the map e.g. “#tag” in this field will show the text “tag” on the map next to waymarker icon.
- You only: (Teams only) Checking this will mean you are the only user who will see this waymarker in the Race Hub and Live app.
- Live: (Teams only) Uncheck this to hide this waymarker in the Live app for all users in your organisation.
- Export: (Teams only) Uncheck this to not include this waymarker in any of the exports. The primary use for this is to allow the team DSs to only include the most important waymarkers in the cue points sent to the rider’s head units.