The VeloViewer Live App is a web app meaning it runs in a browser. It is not a native app so you will not find it in your devices app store. It can run as a full-screen app on Apple, Android mobile devices but also on your laptop, Windows tablet, home desktop. Because the Live app is primarily designed for use when you are on location along a race route, the Apple/Android mobile/tablets are the most common use. A race control centre (organiser, UCI, team) is the most likely use of the Live app on a laptop/desktop.
It is also possible to run the Live app through your car’s built-in display. This uses a small Android device called a “Carlinkit” and is described below.
Apple iOS – iPads and iPhones
Most important, of you are using an iPad, it needs to be a cellular iPad. The WiFi only iPads do not have a GPS capabilities (which are part of the cellular hardware) and only work out their location based on visible WiFi networks. As soon as you leave a built-up area, a WiFi only iPad will not be able to follow your location and would need an external GPS receiver like the Garmin GLO 2. All iPhones have internal GPS support. Note also that some Live app features require an active internet connection but this can be gained by tethering to your phone.
Having an active SIM card installed in your device also improves your location speed and accuracy.
Make sure your devices have all iOS updates applied. Instructions below are based on latest iOS version.
Prior to installing the Live app, perform the following steps to ensure your location is available to the app. Open your devices main Settings app and do the following:
- Settings > Privacy & Security > Location Services : Make sure “Location Services” is enabled.
- Settings > Privacy & Security > Location Services > Safari Websites : Allow location access “While using the App” and also enable “Precise Location”.

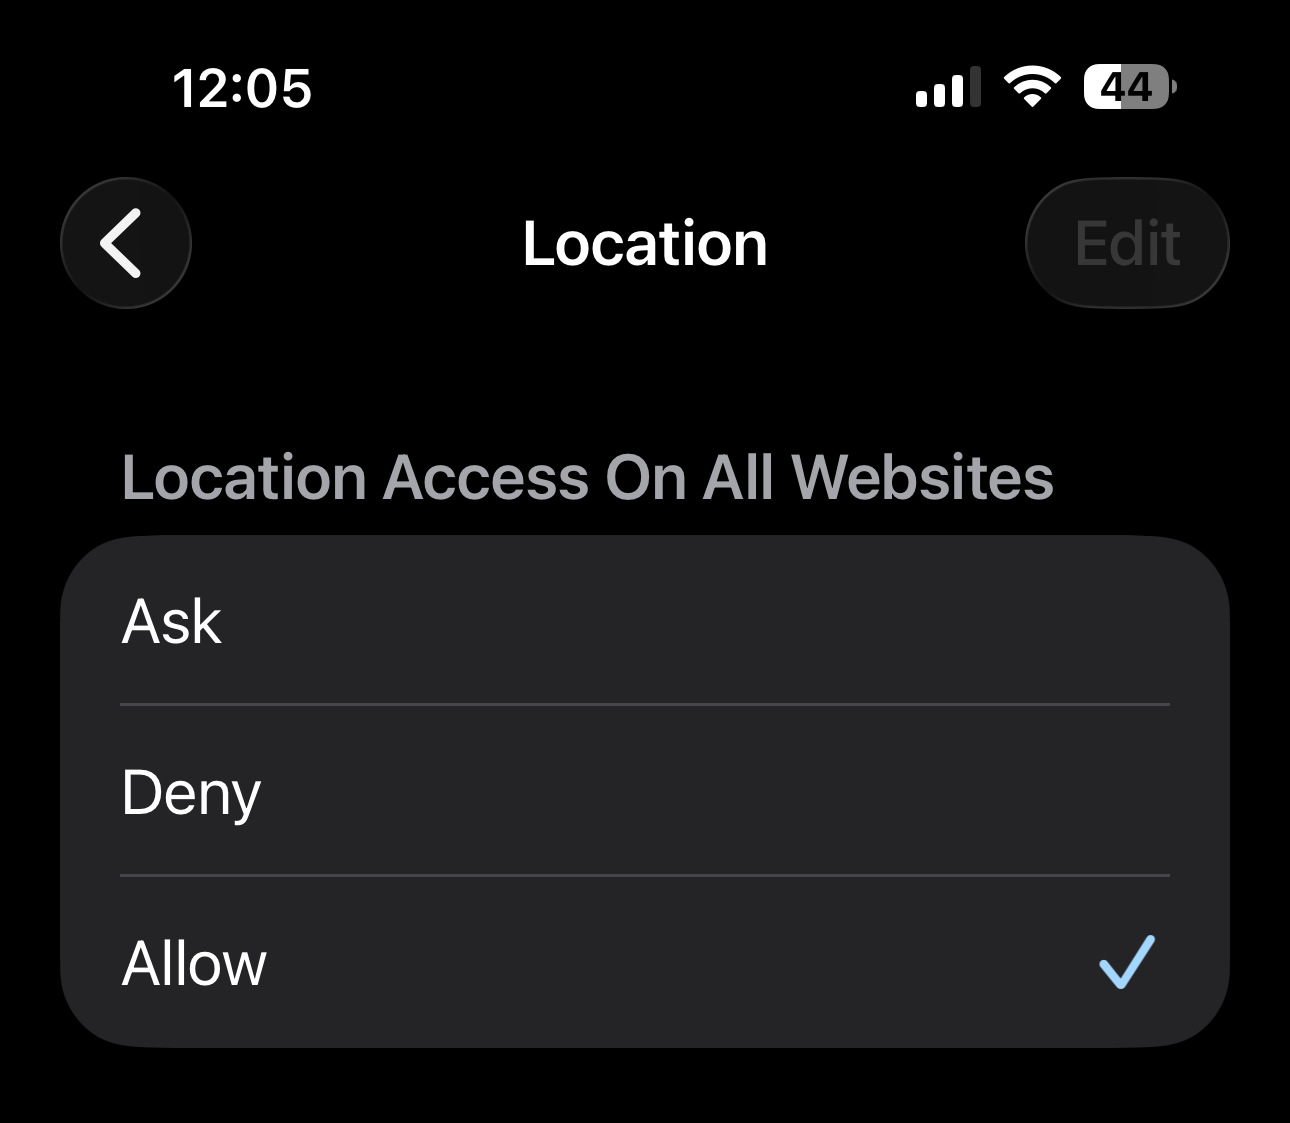
- Settings > Apps > Safari > (“Settings for Websites” section) Location : Location Access On All Websites: “Allow”. This should stop the prompt to allow access to your location each time you run the Live app.
- Settings > Display & Brightness > Auto-Lock : “Never”. This stops the your device’s screen from turning off. If the setting is not shown then this is probably because the device is set up with access to an email account (usually a work email) where the employer’s policies dictate that the device must auto-lock. the only way around this is to not have the email account attached to your device.
That is all of the device settings covered and the above settings not being correct will be the most likely cause of issues. Now let us install the Live app.
If you have access to your organisation’s Race Hub then follow all the steps below. If you have been provided a Live app link by an organisation to use on a single race/stage then just open that link in Safari and skip to step 7:
- On your iOS device, head to your organisation’s Race Hub in Safari (not any other browser). If prompted to log into Strava, make sure you use the same details/method (e.g. email/password, Google, Facebook, Apple) as you usually do. If you use a different method to normal (even if linked to same email address) Strava will create a new account that won’t have access to your Race Hub.
- The “Live” link will be shown in the top right of your Race Hub. Click this link to open the Live app in a new Safari browser tab.
- The Live app will now be running in Safari. If you are prompted to allow access to your location, select yes to allow (step 3 above should avoid this prompt).
You can run the Live app in the browser but a cleaner way is to add the Live app to your device’s Home Screen so you can easily re-open it by clicking the app icon on your Home Screen. This will then run without the Safari wrapper taking up screen space. To do this perform the following steps with the Live app currently open in Safari:
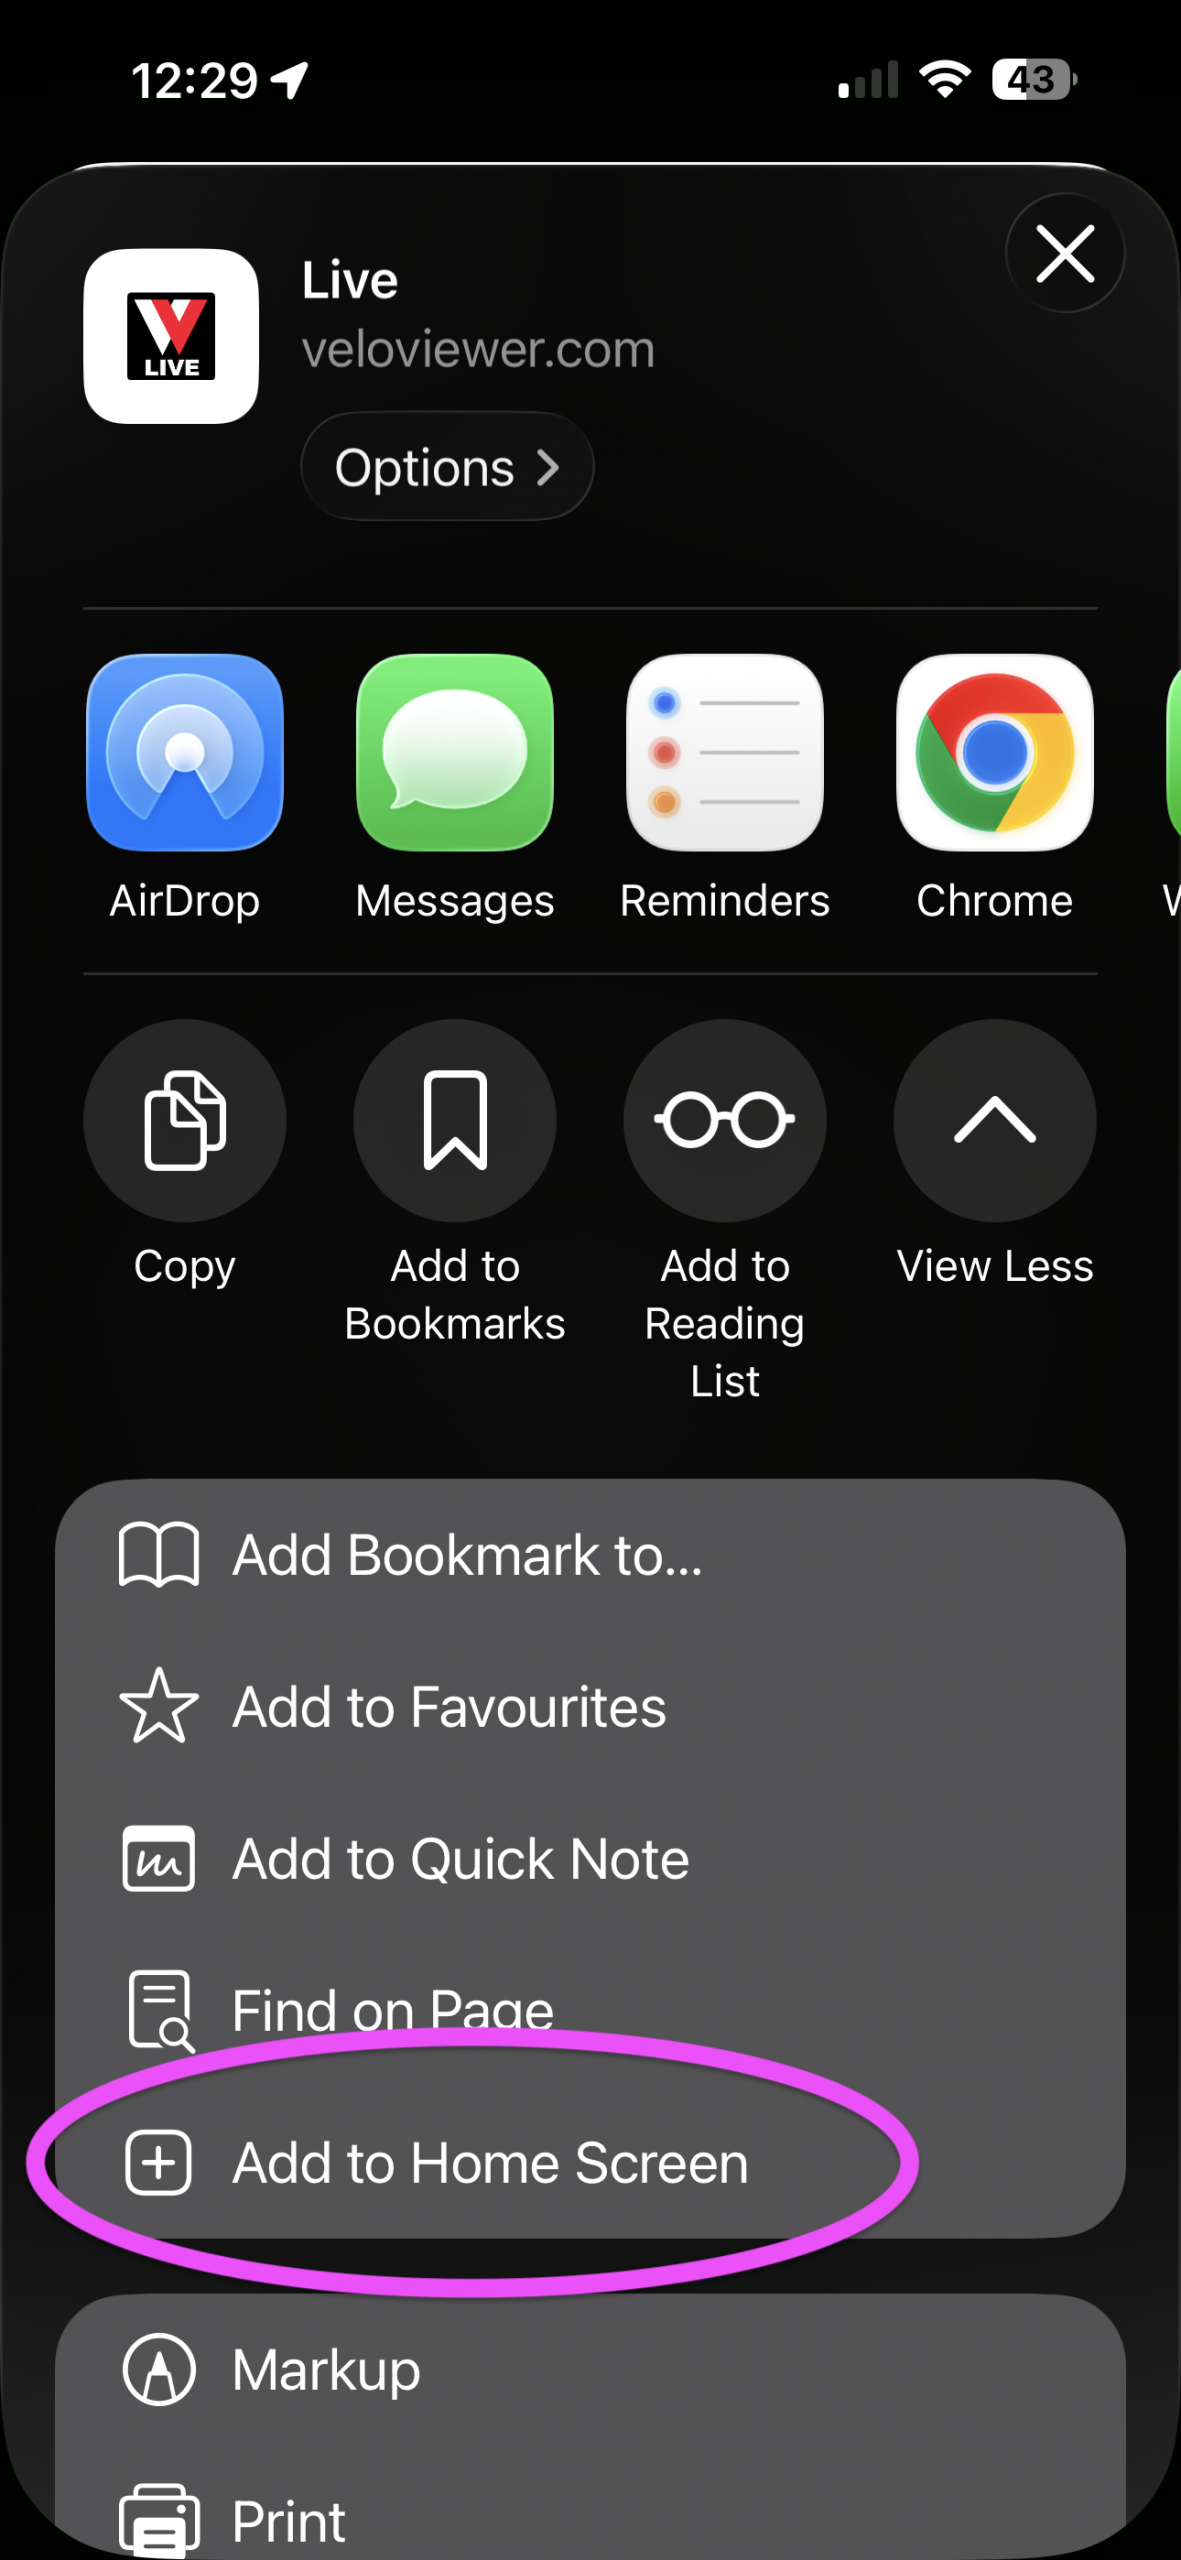
- Tap the share button
 which is either displayed at the bottom or top right of the screen depending on the orientation of the device. A popup (shown below) will be displayed. Scroll down and click “Add to Home Screen” and then “Add” it to the Home Screen.
The Live app will now appear as an icon on your Home Screen and can be moved to your desired location in the same way as any other app. You can close the browser tabs in Safari as you will now open and use the Live app by simply clicking that “Live” app icon.
Android
Typically, all Android tablets support GPS location, but there are so many Android tablets available it is based to make sure that it is GPS enabled before purchase. Android devices can have very different options available as the whole home screen and administration interface can be swapped by the device manufacturer or by the user. Also the version of Androuid installed/supported by each device is much more varied than Apple devices so once again, the settings might be different on your device. These instructions are a rough guide but might be different on your device.
To stop an Android device from automatically going to sleep varies depending on your device. The two options I know of are:
- Settings > Security: tap the gear button next to your lock type and set to none. Note: I don’t personally have a device that has this option but the internet tells me it is available.
- Turn on “Developer Mode”, the device will also need to be plugged into a charger to keep the screen on:
- Settings > About tablet/device/phone
- Tap “Build number” (probably the bottom item) 7 times! You will see a message saying “You are now a developer”.
- Now head to: Settings > Developer options and set the “Stay awake” option to on. This will now keep the tablet awake whilst it is plugged in charging (so make sure it is plugged in when in the car).
If you have access to your organisation’s Race Hub then follow all the steps below. If you have been provided a Live app link by an organisation to use on a single race/stage then just open that link in Chrome and skip to step 6:
- On your Android device, head to your organisation’s Race Hub in Chrome (not any other browser). If prompted to log into Strava, make sure you use the same details/method (e.g. email/password, Google, Facebook, Apple) as you usually do. If you use a different method to normal (even if linked to same email address) Strava will create a new account that won’t have access to your Race Hub.
- The “Live” link will be shown in the top right of your Race Hub. Click this link to open the Live app in a new Chrome browser tab.
- The Live app will now be running in Chrome. If you are prompted to allow access to your location, select yes to allow.
You can run the Live app in the browser but a cleaner way is to add the Live app to your device’s Home Screen so you can easily re-open it by clicking the app icon on your Home Screen. This will then run without the Chrome wrapper taking up screen space. To do this perform the following steps with the Live app currently open in Chrome:
- Tap the Chrome menu button and choose “Add to Home Screen”.
The Live app will now appear as an icon on your Home Screen and can be moved to your desired location in the same way as any other app. You can close the browser tabs in Chrome as you will now open and use the Live app by simply clicking that “Live” app icon.
Car display – Carlinkit
Carlinkit is a small box that plugs into your car’s USB port that runs a full Android device via your car’s display. This is by far the cleanest/cheapest way to use the Live app. I have a in-depth description of the device and how to set it up on the latest-features page. Once the device is working on in your car, then install the Live app in the same was as described for other Android devices above.
Note: The car’s touch screen typically only supports a single touch point, so you can’t pinch to zoom in/out. A “Show zoom buttons” option is available in the Live app’s settings to display +/- zoom buttons on the map.
Other devices
The Live App will run in any browser but is only tested thoroughly on Safari (iOS) and Chrome (other devices). I have heard of the Live app being used on Windows tablets using the Microsoft Edge browser. Microsoft Edge is built on top of Chromium which is the same code that Chrome uses, so there should be no reason why it shouldn’t work on Edge. You could run it on your laptop, especially if you are based in a race control centre, but not many laptops have built-in GPS.
Troubleshooting
I never really hear about people having problems with Android devices, but for iOS devices the most common issue I hear is that the user’s location isn’t being seen. 99% of the time this is because the location settings for Safari have become disabled on an iOS device after installing an update. So recheck the settings described in steps 1 to 3 in the Apple section above to ensure the location service is enabled for Safari.
If you are using a WiFi only iPad, then this will not have a GPS chip so won’t be able to show your location once you leave a location where there are WiFi networks available. Please see the section regarding recommended devices in the Live app overview page.
If you have accidentally denied access to your location when asked then you will need to reset the device’s location settings in order to allow it to get your location again:
- Settings > General > Transfer or Reset iPhone/iPad: Press the “Reset” button and it will show a number of options, press “Reset Location & Privacy“. A video showing that process is available here.
You will then need to re-enable location services for Safari as described in steps 1 to 3 in the Apple section above.