More information on Race Organiser Waymarkers and why they can’t be edit is available here.
10th February 2026
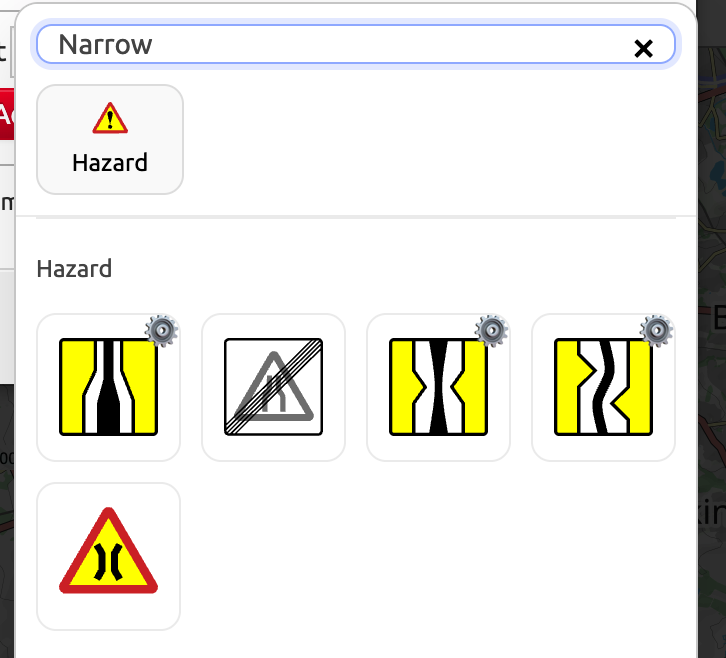
New Waymarker Selector
Provided in both the Race Hub and Live app (V193.30) to replace the previous long (alphabetical) list of waymarker types:

Waymarkers types are now grouped into “Hazard”, “Essential”, “Logisitcs” and (for race organisers and SafeR) “UCI”. Within each group I have ordered the waymarkers based on the most commonly used and most logical layout.
Clicking on the group buttons will auto-scroll the list to that section.
The “Recent” section will show your last 12 types that you have used.
The Search box can be used to filter the waymarker types:
Live app default text for length/gradient of waymarkers
Requests had come from multiple DSs to show the climb length/gradient by default in the list. previously, if a Race Organiser had set some text on the waymarker, the length/gradient wasn’t shown in the list. It will now always display the length/gradient for all types that have an accompanying end waymarker ahead of any provided text:

26th January 2026
ZIP file of all waymarker images now available from the Waymarker Help popup. This provides both PNG and SVG (often preferred by graphic designers) version of all waymarker colour/option combinations.
21st January 2026
New waymarker types and options
New “direction” option of “U-Turn” (demi-tour) for the roundabout waymarker type:

New, dedicated “U-Turn” (demi-tour) waymarker type for scenarios like time trials or city circuits that have a 180 degree tun on the same road. Use the roundabout u-turn option if more appropriate:
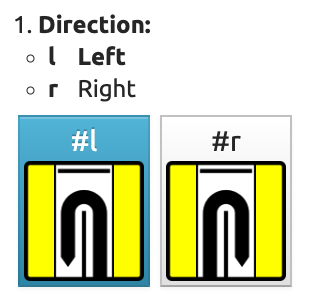
Note that both U-Turn varieties default to driving on the right side of the road. For the UK/Australia/Japan or when on the wrong side of the road in Europe/US then you’ll need to change the options accordingly.
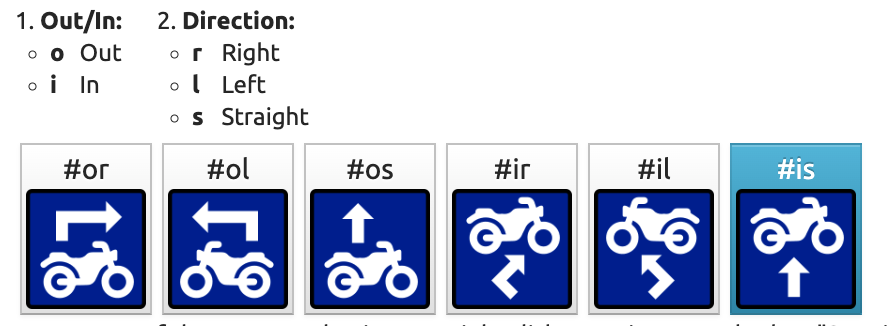
New “direction” option of “Straight” for the Way Out/In waymarker type:
18th January 2026
New SafeR waymarker type
New waymarker type specifically for SafeR course analysts to enable them to mark locations that the analyst needs feedback from the Race Organiser about safety management. This waymarker type is only visible to race organisers and SafeR/UCI and will always be set to the “UCI Level”.
12th January 2026
New Options for Central Island
You can now (optionally) specify the side taken by the race on a central island waymarker:

11th December 2025
Bad Road Waymarker Options
The existing “Bad Road” waymaker has been extended with options to be a bit more specific about the location of the area on the road concerned:
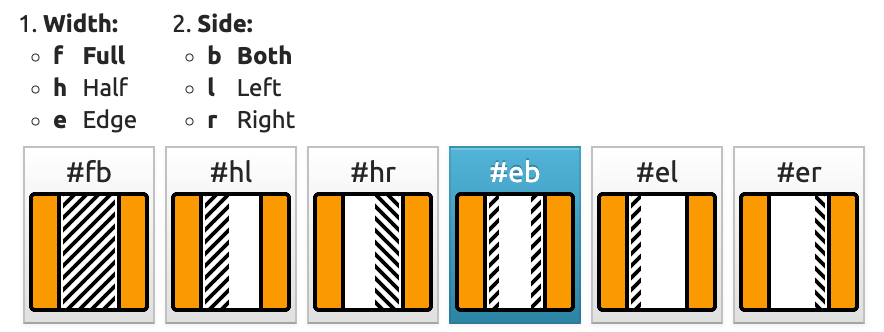 The full and half width should be obvious in their usage, allowing race radio and DS’s to direct riders to keep to the left or right, away from the area of concern.
The “Edge” option is for a number of uses including the following specific examples:
- Cobbles in the gutters.
- Drainage gulleys.
- Intermittent cycle paths, especially those with curbs that come and go or have intermittent dividers.
I’m sure there are many other scenarios where this Edge option is useful.
The description of the nature of the hazard should be included in the notes field.
Print/PDF version of all Waymarker Types/Options
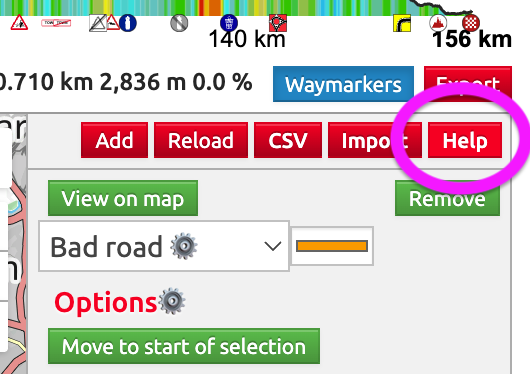
I had a request for a waymarker “cheat sheet” that an organiser could print out and use for reference. This is now available from the Waymarker Help popup:
With three print buttons shown at the bottom. The H3/H2/H1 determine the colours used in the images shown in the page opened:
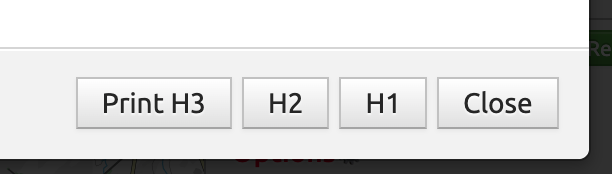
A new, dynamically generated browser tab will open listing all the waymarker types along with available options. You can then print that page directly or use the print dialog to save it as a PDF document. Note that the grey background on table rows (that helps with reading the document) may not be shown on the print/pdf by default. If not, then expand the Settings in the print dialog and enable “Background graphics” (text might vary). This is usually off by default when printing to save ink.
Of course, as new waymarker types are added or updated to include new options (see this page for updates) then you would need to print a new version.
Click here to view an H3 version of this pdf document as of 11th December 2025. To get the latest waymarker types and options follow the steps above.
Rename of waymarker
The “Waste Zone” has been renamed to “Litter Zone” due to some confusion as to the extent of what “waste” might have been disposed of!
28th November 2025
A few more waymarker types have been given options and the Options popup has been improved to make it much easier to find and select the option you are wanting to use.
Left/Right/Straight Waymarker Options
Previously the Left and Right waymarker types would show an image of a gentle bend which could then be coloured. You can now use the options to not only specify the severity of bend but to also show if it is part of a junction along with accompanying street furniture and whether the resulting road is narrower.
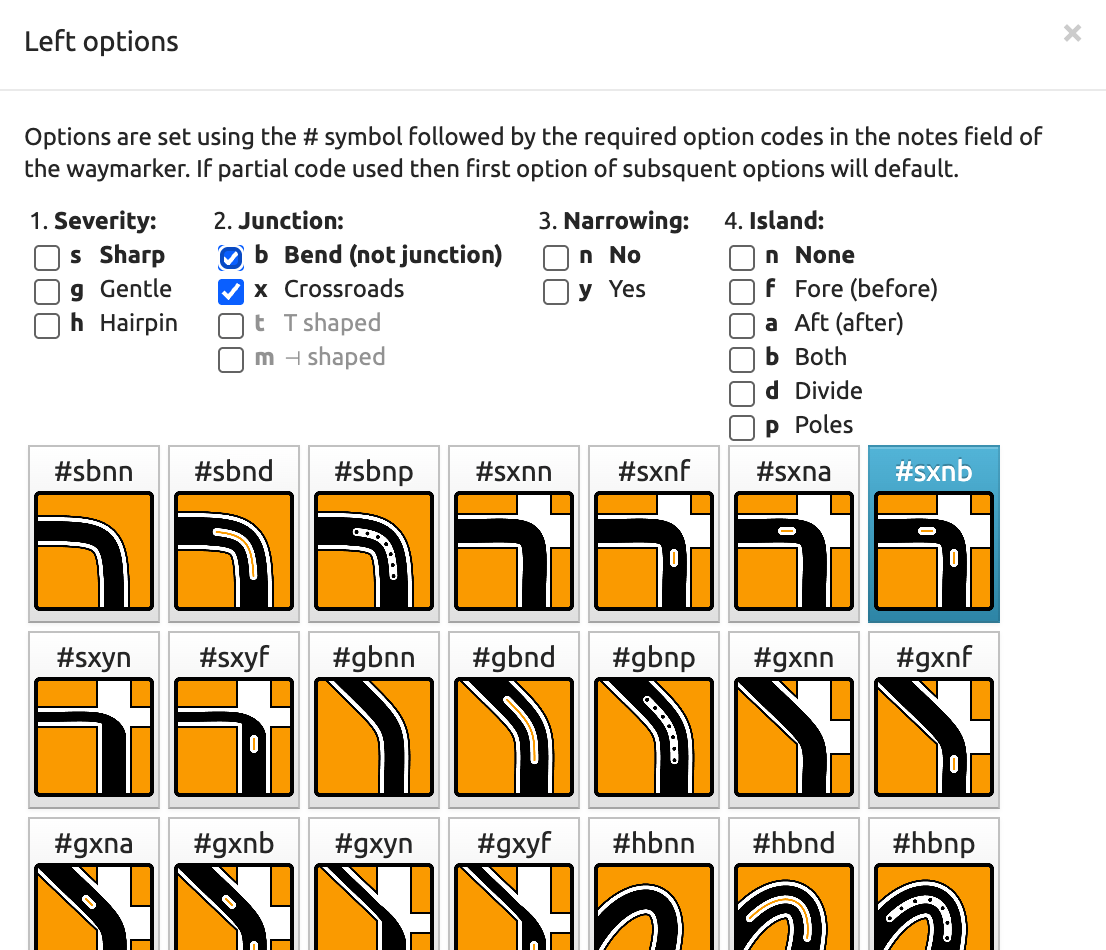
Note that not all combinations are available:
- “Narrowing” is not available for “Bend”
- For “Islands”, “Divide” and “Poles” are only available for “Bends”. “Aft” Islands aren’t available on narrowing roads.
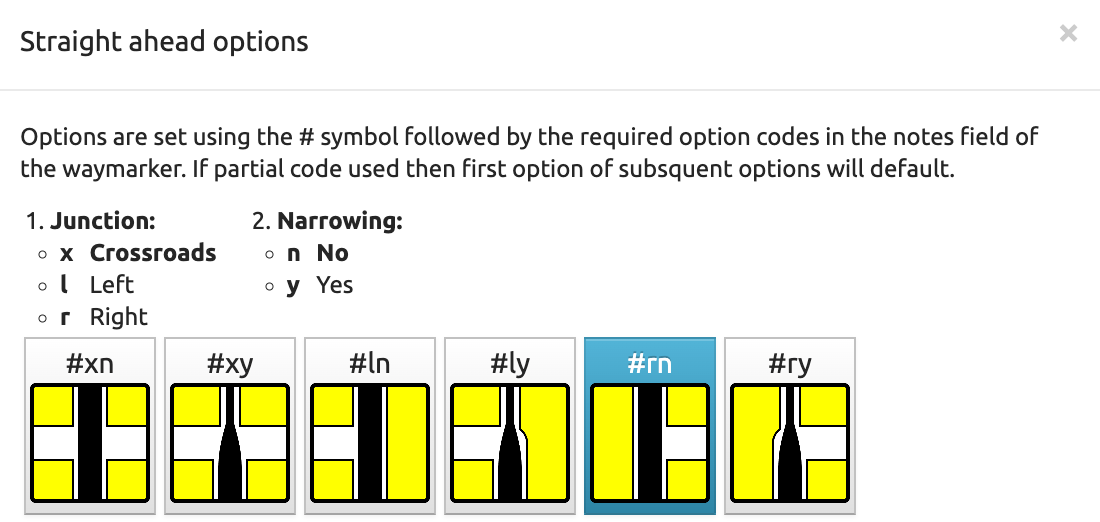
The Straight waymarker type is probably more useful for Race Organisers where they might need to mark out junctions that require police/marshals dealing with side roads. But it does offer the ability to describe a narrowing at a straight junction.
Note: Race Organisers should still use the dedicated “Narrow Section Start” waymarker in conjunction with a “Narrow Section End” waymarker even when using a “Narrowing” junction waymarker as these will be clearer to UCI commissaires and regulators.
Way Out/In options
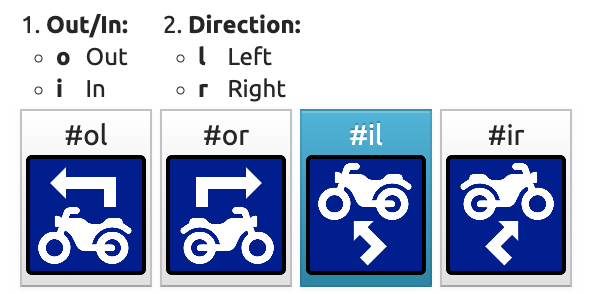
Only available to Race Organisers. They can now pick whether the going out or in as well as left or right.
Filtering and Easy Option Section
As you can see in the “Left Options” image above, once there are more than two rows of possibilities then the possible options are shown with checkboxes that let you filter the list of items shown.
Also, the currently selected option is highlighted in blue.
And to make life much easier, if you are editing a waymarker and open the Options popup, then you can simply click the icon that you are wanting and it will automatically apply that option to the notes field.
Warning >>> and Warning <<<
After discussions with SafeR, we have decided that the “Warning <<<” and “Warning >>>” waymarker types should be restricted to the Race Organiser levels. These can then be used to highlight where signage is required to the logistics teams. Set the colour as needed.
To highlight sharp corners to teams then use the “Left” and “Right” waymarker types with the new Options accordingly.
KMZ Export
I’ve updated the KML export option so it now a KMZ file instead. A KML is a simple text file that can link to externally available images. This wasn’t able to reference waymarkers with colours or options applied. A KMZ file is actually a ZIP file that includes a directory of images required along with the KML file.
If you are wanting to share the route with all of waymarker information as you see it within VeloViewer then the KMZ file is the best option. These can then easily be viewed in Google Maps or Google Earth along with other applications.
19th November 2025
A large update with a number of major changes for waymarkers being released in conjunction with the 2025 AIOCC General Assembly where Rachel and Ben will be presenting alongside Christoph Hugl representing SafeR. I’ll cover off the functional changes within VeloViewer here and we will also share Christoph’s race organiser waymarker usage guidance when we can.
Waymarker Level rework
The Race Organiser Levels set on waymarkers are having a bit of a make-over so it is a bit clearer what each is for and a couple of new additions based on the race organiser/team/commissaire feedback that has been collected by SafeR over the 2025 season:
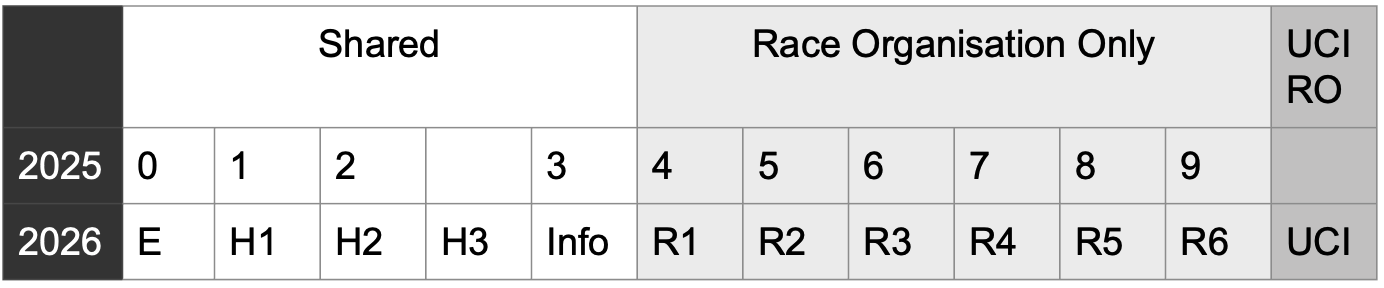
Initially the levels were a simple 0 to 9, but as you can see in the above table the new names/codes shown for each has been updated and a new H3 and UCI level added. The usage of the original 0-9 levels remains basically the same as it did in 2025 but with the new names.
- E (Essential): e.g. Sprints, climbs, pavé/gravel.
- H1 to H3: Different severities of hazard (see below for more information).
- Info: e.g. feed zones, race HQ, hotels.
- R1 to R6: Internal to Race Organisers.
- UCI: available to Race Organiser, UCI Commissaires and SafeR to mark incidents and near misses during the race to then be used in the SafeR Incident Review Panel.
New H1-H3 Hazard Levels
The definition of the hazard levels has been provided by SafeR along with a set of recommendations for Race Organisers (to be shared here later) with a goal of providing a more consistent set of information for teams and commissaires across the season for races where the organiser is using VeloViewer.
- H1: A critical hazard – Any area or situation on the course that may present an elevated level of risk to riders, even when standard safety measures are in place. Within VeloViewer, these areas are automatically indicated in red. Examples may include unexpected obstacles appearing after a corner, surfaces that are unsuitable for road bikes, sections of traffic infrastructure in the final three kilometres requiring extra caution, or sudden transitions where the roadway narrows. All significant hazards should be addressed on site, ideally with the assistance of marshals, and noted via race radio for rider awareness. For a typical 160-kilometre race, it is advisable that the number of such significant hazards be limited to approximately 5, where practicable.
- H2: A major hazard – A potential risk that requires the attention of the race organiser. Typical examples include rail crossings, road furniture in descents or urban areas, tunnels and bridges with narrowing sections, steep technical switchbacks, speed bumps within the final five kilometres, and cattle grids. In VeloViewer, major hazards are automatically displayed in orange. It is recommended that the number of major hazards in a 160 kilometres race does not exceed 15. All major hazards should be clearly signalled on site and must be communicated through the race radio.
- H3: Other hazards – Any obstacle or route feature that may interfere with the smooth conduct of the race but does not constitute a major or critical hazard. Examples include raised pedestrian crossings or speed bumps located far from the finish, changes in road surface, or traffic infrastructure situated on wide and straight sections of road. The primary purpose of identifying other hazards is to support pre-race preparation. This information is shared with the teams, who may decide whether or not to display it. Normally, other hazards do not need to be communicated via the race radio if adequate on-site signalling is in place. Nevertheless, organisers are encouraged to identify and mark all potential issues within this category to ensure thorough preparation and safe race operations.
New/Updated Waymarker Types
Note: Pressing the “Help” button at the top right of the waymarker list in the Race Hub will show a popup with a list of all waymarker types and their descriptions.
Updated:
- Existing “Narrow” waymarker type renamed to “Narrow section start” to signify the beginning of a longer stretch of narrow road (options available).
New:
- Narrow section end: To follow a “Narrow section start” waymarker to show where the road widens again. The length of the narrow road will automatically be shown. When provided by organisers, these will also be useful for UCI commissaires and regulators to know the best locations for allowing vehicles to pass and service riders.
- Narrow pinch: To highlight a short, narrow section (options available).
- Sprint zone: To mark the location from where GC times will be taken on a sprint stage.
- Race HQ
- Circuit enter
- Circuit exit
- Incident: Available to Race Organisers and UCI Commissaires to record racing incidents for later review.
- Near miss: Same as Incident waymarker.
- Circle/Triangle/Square: Race Organiser only, used for race logistics.
Waymarker Options
A number of waymarker types now have options available which can be used by Race Organisers as well as teams. These allow the waymarker image to be altered to show more specific detail for the particular item by setting a hashtag in the main waymarker notes field. Initially these options are available on Central islands, Narrow chicane, Narrow pinch, Narrow section start and Roundabouts. Options for Left and Right waymarkers are also underway to signify whether the tun is a junction or a bend in the road along with its severity and road furniture.
A video of the waymarker options in action is available here:
As an example, here are the available options for a roundabout waymarker:
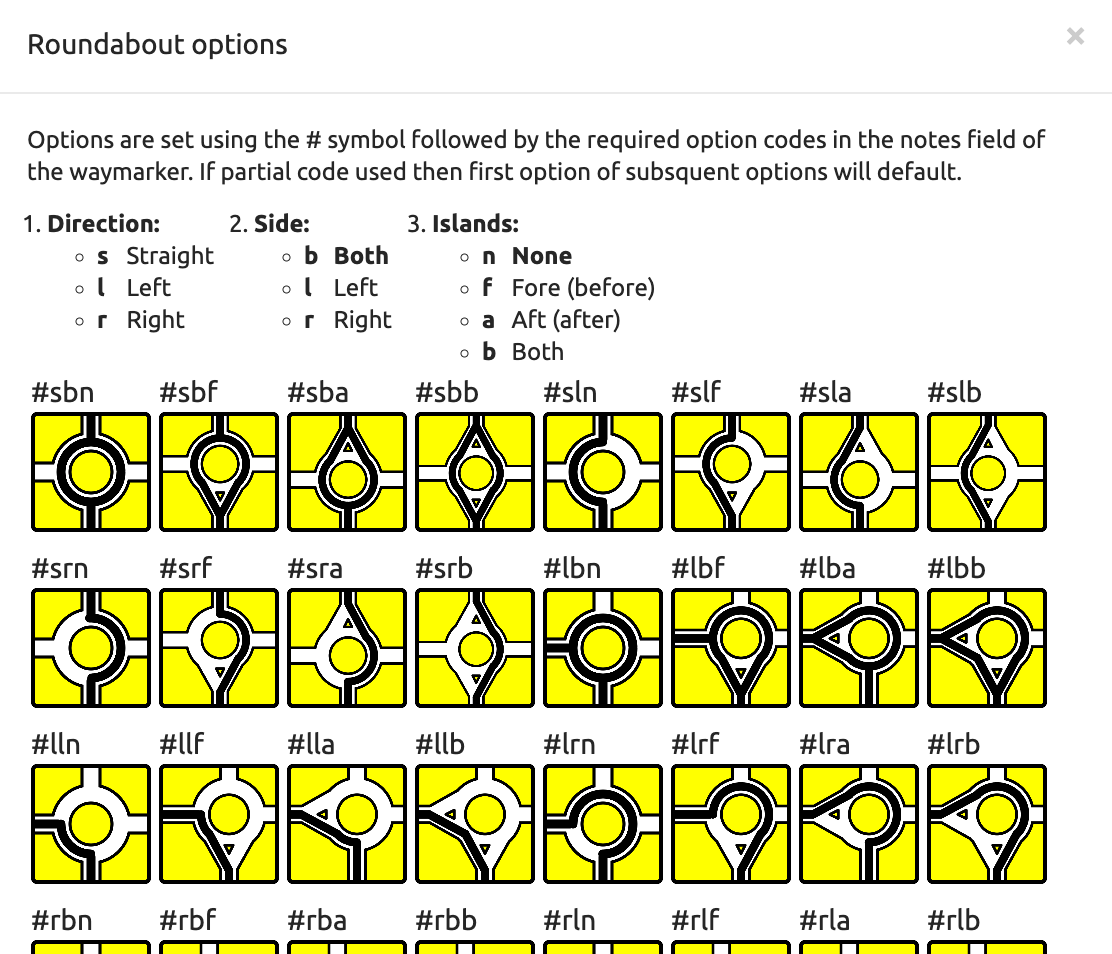
These popups with all of the option combinations are available from the Race Hub where you see the red “Options ⚙️” link (in the waymarker list and from the waymarker Help popup).
There will be SafeR guidance to Race Organisers about when these options are expected to be used.
Live App Updates
I’ve made a number of small, visual updates to the Live App and of course allowing it to display the new waymarkers and the waymarker options. A minimum of V183.19 of the Live app is required to display these. I’ve also added the ability to set/update colours to waymarkers in the Live App.
12th November 2025
Small but hopefully useful update. In the Race Hub and Race Admin pages you will now see a 🚘 icon shown alongside the race name for races where the organiser is also using VeloViewer. The majority of these are AIOCC races whose members have access to VeloViewer via their AIOCC membership although we do have a few non-AIOCC races’ organisers using VeloViewer as well.
1st July 2025
Swapping Training Camp Routes
Training camps in your Race Hub are based on Strava Routes. When these have been plotted out by hand in Strava then they are very easy to modify. Just edit the route in Strava and then open the route from your Race Hub and it will automatically pull down the updated route. However, if you have created your Strava Route directly from a GPX file (from the ![]() “Upload GPX” button) then it can be difficult to make edits. You might have used this method to create a Route because you prefer, or are needing to use, another tool (e.g. RideWithGPS) to plot your routes or you have been given the GPX file by a race organiser. Therefore you need to create a brand new Strava Route from the new GPX file. Previously there wasn’t a way to swap the route for an existing stage in your Training Camp, but now that is possible.
“Upload GPX” button) then it can be difficult to make edits. You might have used this method to create a Route because you prefer, or are needing to use, another tool (e.g. RideWithGPS) to plot your routes or you have been given the GPX file by a race organiser. Therefore you need to create a brand new Strava Route from the new GPX file. Previously there wasn’t a way to swap the route for an existing stage in your Training Camp, but now that is possible.
If you are the owner of the training camp or the owner of the stage, you will now see a new “Swap” button that will prompt you for the new Route’s URL (or just the big number at the end of the URL which is the Routes unique id) which will swap the route id being used for that Training Camp Stage:
Note: Before a change in route is visible in the Live app (either from editing the Route in Strava or swapping to a new Route) you need to open it from your Race Hub. The code in the Race Hub’s Route Details page processes the Route and creates/stores the data necessary for the Live app.
Note: Routes can be private in Strava but still used in your Training Camps and be visible to other users of your Race Hub.
23rd June 2025
New version of the Live app for this release is: V179.16
New waymarker types and slight change to icons
- Warning >>> – Warning for sharp right turn. Primarily for race organiser signage but can be set as Level 1,2 hazard to share with teams. Also available for teams to use.
- Warning <<< – Warning for sharp left turn.
- Deviation waymarker icon updated to be a blue square with arrow to make it obviously different from the “Warning >>>” waymarkers.
18th June 2025
New version of the Live app for this release is: V178.15
Velon live rider tracking improvements
I’ve been working with the technical staff at Velon to improve the reliability of the live rider tracking. The Live app (in V178.15) is now pointing at a different Velon data feed which is is providing better data.
13th June 2025
New version of the Live app for this release is: V177.15
New Waymarker Types
- Barrier – Available to race organisers only.
- Chicane – To highlight the common road-furniture comprising of a build-out from the right followed immediately by a build-out from the left (opposite for UK/Australia).
- Deviation Left – To show where team/race vehicles are to leave the race course, arrows pointing to the left.
- Deviation Right – As above but arrows pointing right.
- Hotel
- Way Out/In – To show where motorbikes can leave/enter course to get ahead of riders. Available to race organisers only.
21st May 2025
Updated waymarker popup

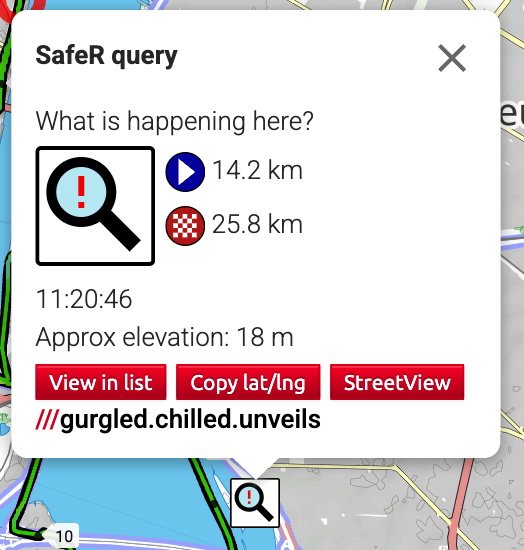
Some updates to the waymarker popup in the Race Hub to show a bit more information:
- Waymarker type and description shown at the top.
- Distances from km zero and to end now show multiple values if the route takes in the waymarker more than once. If more than three then all values shown in tooltip when hovering the mouse.
- Expected arrival time(s) shown based km zero time and expected speed which are set a the top of the waymarker list. this will correspond with the time/weather shown in the top right when moving mouse over elevation profile.
- Approximate elevation. This is never going to be exact so race organisers should find official source for elevation to use in road book and graphics.
- A StreetView button has been added which will open the Google StreetView at this location.
- Not new but the WhatThreeWords text/link is also shown at the bottom if you need to share the location to someone not using the Live app. e.g volunteer marshals.
23rd April 2025
Race Organisers – Restricting visibility of races and “training camps”
Race organisers can now restrict visibility of races and “training camps” (e.g. future years’ races) to just themselves and/or selected users within their Race Hub.
For example, you are wanting to plan the next year’s race so create a Training Camp (dates can be for the next year or just for a later point of the current year) and add in the routes of stages that you want to explore with VeloViewer. You can then use the Race Hub and Live app to help check the suitability of the routes. You might not want all users of your Race Hub to see these routes so in the Race Hub you will see the option below the race info to restrict the access. Initially this would restrict access to just your user, but then you can also give access to other users as needed.
This option is also available for the current season’s races but you will need to get in touch with Ben/Rachel at VeloViewer to set up which account should be the administrator for the access for the race.
17th March 2025
Garmin export bug fix
Some longer courses were not being exported successfully from the Race Hub to user’s Garmin Connect accounts. This was due to the number of lat/lng datapoints hitting a limit imposed by Garmin (roughly 10k). I now simplify the lat/lng points to get the total to be < 10k for this Garmin export. Let me know if anyone still has any issues.
If you are using the Garmin Edge 1050 or above (or many other head units from other brands) and using a Apple laptop then you will need to use an app like OpenMTP to be able to copy files directly to the device if needed.
Live app updates
New settings:
- “Hide user when data >” : Sets the age of user’s location before hiding from the map.
- “Show zoom buttons” : Option to toggle on the map zoom buttons. This is added to better support the car display integration detailed below.
Live app on a car’s built-in display

Over the years I’ve had numerous requests for being able to run the VeloViewer Live App on a car’s main, built in display. Traditional Apple CarPlay and Android Auto are locked down and don’t allow apps like YouTube, Netflix or browsers (Safari/Chrome) from being used via those connections for obvious reasons. But one user has discovered a specific device that circumvents these limitations resulting in what you see in picture above.
The device is called a “CarlinKit TBox S1” but I’ve also seen it called “CarlinKit Android 13 Wireless CarPlay AI Box” and are available from eBay, Amazon, AliExpress from around £100. The one I bought has model “CPC200-TBox S” written on the box so perhaps an earlier version, but it works fine. I’m sure newer models will become available that will also work.
The devices are basically a cheap Android tablet with no battery or screen. They get their power from the USB and use the car display as a standard screen, resulting in your car display showing a full version of Android allowing you to run Chrome and therefore the VeloViewer Live app.
The minimum requirement for your car is that it already supports CarPlay/Auto. Apparently these won’t work on some older BMW’s as there must be some extra restriction on the display. I’ve tested it successfully in our Kia and I know that it is also being used successfully in a Skoda. I also tried it in our van’s Kenwood, after-market CarPlay/Auto display which also worked.
The device plugs into the car’s CarPlay/Auto USB port and it takes about 30 seconds to start up after turning on the car’s power. I tethered the device to my phone for internet access but it has a micro SIM card slot which will avoid having to re-tether it each time it is restarted. I’m sure you could also connect it to a WiFi hotspot if you have one in the car.
First time using it I went through the various updates that it asked to apply which took around half an hour. Make sure any required updates are performed as well as making sure Chrome is up-to-date (please also see update below regarding installing “Nova Launcher”). I then used Chrome to log in to Strava/VeloViewer and open the Live app from the Race Hub, added it to the home screen. Running the Live app from the home screen then loads as shown in the above image.
In the Android settings there is an option to use the car’s built-in GPS rather than the device’s GPS. I would imagine that would be a better option as then you can tuck the device out of the way without it needing to “see” the GPS satellite signals.
It then works almost exactly the same as any other Live app running on a tablet. The only limitation I’ve found so far is that the car’s touch screen (in our Kia) doesn’t support multi-touch. You can double tap the map to zoom in and panning the map works as expected, but there is no way to pinch zoom back out. Often the map will re-zoom automatically after a few seconds but there is now the Live app setting to show the map zoom buttons.
I’m very much an Apple user and rarely use Android devices so I did have a few moments where I didn’t know what I was doing (I accidentally blocked veloviewer.com domain from accessing location info in Chrome so had to resolve that in Chrome’s settings) but it was fairly straightforward. But be prepared for a little bit of frustration and Googling for answers when getting it initially set up.
Update: I noticed that the Live app icon was disappearing from the Home Screen when the device restarted. Most likely due to the “launcher” (basically the software that runs the Home Screen) is provided by the CalinKit and isn’t very reliable. I installed and enabled the free version of the Nova Launcher which is a much more reliable and widely used launcher which isn’t suffering from the same issue.
3rd March 2025
New version of the Live app for this release is: V172.13
New Waymarker Types
- Feed end
- Bidon end
- Waste end
- Town end
- Road works
Single Stage Live App Link
For race organisers only, this is almost identical to the “Single Race Live App Link” described below but only provides access to the one stage. Only shown on stage races:

Once again, right click on and copy the link, then send it to whoever needs it.
25th February 2025
Single Race Live App Link

At the request of a number of race organisers there is now a “Single Race Live App Link” available for each race in your Race Hub. This allows you to provide Live App access to any number of people without setting them up with access to your Race Hub (they will not have access to the Race hub) and they will only be able to see the one race in the Live app. The day after the race date, that Live app link will no longer load any race information.
If you are a Race Organiser, the Single Race Live App link offers the same functionality as a user with restricted access. i.e. they can view all waymarkers but they can’t add/edit waymarkers. This can be used by marshals, race convoy vehicles, central control centres etc.
If you are a Team, the Single Race Live App link offers the same functionality as a user with Helper access and should be used if you are using external people to help with providing wheels. i.e. they can only view feed, bidon, wheel waymarkers and can’t add any waymarkers. Team Staff would be better logging in with a Strava account as they work across multiple races. Check out the entry from 30th January 2025 below about sharing single logins across multiple staff for other options in this area.
Live locations can be shared and viewed by any number of the users with the link.
To share the link just right-click the “Single Race Live App Link” and “Copy Link Address”. Paste and send the link to whoever needs it.
4th February 2025
New waymarker types and colour options
Note: New waymarker types and options are only visible in version V169.10 (or higher) of the Live app. this is displayed in small text at the top-middle of the Live app’s main page. Please get in touch if your Live app doesn’t upgrade automatically (loading it up while on a good WiFi network, leaving it for a minute, then reloading).
I have added a few new waymarker types and renamed a few to make it clearer what they are to be used for. New types:
- Winds end – Added after a Winds waymarker to show where the windy section will end. The preceding Winds waymarker will then automatically display the length of the windy section.
- KOM – This is a red KOM marker (the same as the categorised KOM waymarkers) to signify the top of a climb that counts towards the KOM competition but doesn’t have a category, either because it is not known or the race isn’t using KOM categories. This is a new type and the original “KOM” waymarker has been renamed to “Summit” described below.
- Bad road – This is highlight a short section of bad road. e.g. potholes, gravel that shouldn’t be there or other unexpected road surface. This is different from the “Sector start gravel” which is intended to show actual gravel roads.
Renamed waymarker types:
- Speed bump – This was previous just called “Bumps” but was sometimes used to mark “bad roads”. I’ve also changed the icon slightly to be more like a speed bump.
- Summit – This was called “KOM” but that was a long time mis-naming of that waymarker type. It is still the Blue KOM icon to signify it doesn’t count towards the KOM competition.
- Sector start/end pavé/gravel – I renamed these so they all start with the word Sector resulting in them being grouped together in the list. Also it hopefully makes it more obvious that these are to show a length of pavé/gravel using both a start and end waymarker, not as a single waymarker to highlight a short section of bad road surface (which should now be done with the “Bad road” waymarker).
Red/Amber/Green hazard colour options have been added to all appropriate waymarker types. Other colour options also provided for Info, Parking.
We’ve also updated the wording around Race Organisers waymarker levels based on Teams DS feedback.
30th January 2025
Sharing single login for multiple Live apps
Up until now it has always been the case that in order to share your location via the Live app you needed to the only person using the Strava account. Multiple using the same account and sharing locations would result in the user jumping between the 2 (or more) locations when viewed by other users in your team. I now create and store a unique identifier for each Live app (saved in the app’s storage) which is used with the location to allow for multiple users to share a single account and all share their unique locations with the rest of the team.
The downside for sharing accounts within VeloViewer, and especially the live app, is that it is very hard to revoke access to a single user. If your users are connecting only with their own Strava accounts, you can easily remove the one user’s access. This is still the case so I would only use this option in special cases. e.g. The UK Police have ~30 Android phones that they set up with the Live app and attach to all of the police motorbikes for the duration of the race, and take them back at the end. They will now only need to have a single Strava account so their set up will be much easier.
I’m not sure if this will be a widely used feature for teams. I certainly don’t recommend it for an account with “Full” access.
Next on my to-do list is looking into providing single race Live app access, i.e. a Live app link that will only give (restricted) access for a single race in the context of your organisation. This could then be shared with team helpers to ensure they can only use the Live app at that single race and not see any other race information.
New waymarker type colour options
I’ve rebuilt the way waymarker types are defined behind the scenes with the waymarker type images now being stored as SVG’s in code rather than images on the server. This will allow me to provide new waymarker types much easier and also allow modifiers. For example I’ve now been able to provide colour options for the following waymarker types:
- Feed
- Roundabout
- Info
Alongside the already existing colour options for Bidon, Left and Right.
Restrictions on waymarker Levels for Race Organisers
Part of this refactoring of code was to let me limit the “Levels” available for each waymarker created by a Race Organiser to try and reduce the chance of a waymarker being set to an inappropriate level. e.g. Feeds/Waste can now only be set as Level3.
8th January 2025
Race Organiser Waymarker Filtering
The final piece in the Race Organiser waymarker puzzle is the ability for teams (and for race organiser users) to hide waymarkers they don’t need to see in both the Race Hub and the Live app.

In the Race Hub you will see an “Race Org level filter” section at the top of the waymarker list. The blue ? provides a popup with help information. Teams will see levels 0 through to 3 with the count of Race Organiser waymarkers for this route for each level shown in brackets. Unchecking each box will hide those waymarkers. The “All” box allows you to quickly hide or show all of the Race Organiser waymarkers.

In the Live app a similar list is shown at the top of the waymarker list. Note that it will scroll up as you progress along the route but you can always access it by scrolling the list all the way down. Tapping on this “Race Org Waymarkers” section opens a popup which lets you toggle the filters:

Note that when a Race Organiser is using the VeloViewer WorldTour package in the race, the safety officer ahead of the race may add in waymarkers for unexpected hazards (e.g. an oil spill or a lorry pulled to the side of the road), these should be added with a Level of 1 so it is worth leaving Level 1 checked during the race to see any of these new waymarkers.
Race Organisers will see levels 0 through to 9 in these filters. This allows, for example, if level 7 waymarkers are being used to show where the signage teams needs to place the signs, they can filter out everything else that isn’t relevant to them.
11th December 2024
Race Organiser Waymarkers in Live App
Following on from the Race Organiser’s waymarkers shown in the Race Hub (29th November below), the corresponding updates have been applied in the Live app. Organiser’s waymarkers will be listed with the “Level” shown in white text on a black background in the top right of the waymarker info in the list on the right of the screen:

This level is also shown in the waymarker popup.
Note that these organiser waymarkers are not editable and cannot be deleted by teams, even in Recon mode.
As with the Race Organiser waymarkers shown in the Race Hub, the next step is to allow teams to hide them based on their given level. For more info in how levels should be used by Race Organisers see the previous entry below.
29th November 2024
Strava API usage
You may have seen in the media that Strava have updated their terms relating to use their API (the way VeloViewer gets its data from Strava). We have spoken with Strava and the WorldTour package is completely unaffected. The other side of VeloViewer (people looking at their own Strava data) only requires a small modification to comply.
Race Organiser Waymarkers
The VeloViewer WorldTour package has been used by a few race organisers for a few years but for 2025 this is set to grow. The most obvious thing you will notice within VeloViewer is that Race Organisers will be able to add waymarkers and chose to share them with the teams. These will now show up automatically in your waymarker list. If the Race Organiser isn’t using VeloViewer but the GPX files included the main race waymarker information (e.g. sprints, climbs etc) then I will add them in and they will show in the same way.
If a race organiser is using VeloViewer you will see a message below the stage list in the Race Hub saying so.
When a Race Organiser adds a waymarker they can give it a “level” between 0 and 9 to be used as follows:
- Level 0: Essential race info e.g. Sprint/Bonus, KOM (HC/1/2/3/4), KOM start, Pavé/Gravel start/end.
- Level 1: Critically dangerous features. Often an unexpected element. Would always be considered dangerous. If not addressed appropriately, a crash/incident is highly likely.
- Level 2: Route features that could be dangerous in certain circumstances. If not addressed appropriately, there is a moderate chance of incident/crash.
- Level 3: Other info that could be useful to the Teams e.g. Waste/Feed zones, PPO, Anti-doping, Parking.
- Level 4 (and above): Race Organiser only – All other features, Normal junctions, Info for marshals, logistics for signage/barriers, other information for Race Radio.
Currently you have no way of hiding these waymarkers but that is just temporary. Before the racing starts again in 2025 I will provide a way for teams to chose to hide Race Organiser waymakers based on the level, so you can choose to just see level 0 waymarkers, or levels 0 to 2 etc. That choice will be reflected in the exports to head units. This will also be provided in the Live app.
During the race the organiser’s safety officer driving ahead of the race will be able to add waymarkers for unexpected hazards, set the level to (for example) 1 and this will be automatically shared with the teams as well.
15th July 2024
WayfloW StreetView video integration
I am super happy to announce a new collaboration between VeloViewer and WayfloW. This platform enables you to generate realistic videos of your race segments using StreetView images and Artificial Intelligence.
Powered by Machine Learning and Computer Vision models, WayfloW can also calculate new metrics that have never been seen before, such as turn angles, road width and visual wind simulations. This new technology and all its data will allow you to plan sophisticated racing strategies for your Time Trials, Climbs, Descents and Sprint Finishes.
We have prepared a WayfloW Sample Video for your reference.
Thanks to our collaboration, you will be able to generate and watch WayfloW videos comfortably and directly from VeloViewer, under the new tab named “Videos”:

As a first step, Alex from WayfloW is going to generate the videos of the most relevant segments of Tour de France stages 16-21 for you. The videos will already be posted and available today.
Since you are a VeloViewer WorldTour user, you will be eligible to test WayfloW and generate your own videos for free after the Tour de France, for a trial period.
For more information, please visit https://wayflow-cycling.com or send an email to contact@wayflow-cycling.com to contact Alex directly.
12th June 2024
Import/Copy waymarkers from one race to another
If you wish to copy waymarkers from one race/stage to another then now this is possible using the Waymarker Import button. This could be from the same race the previous year, a different race that covered some or all of the same course, or even from one team’s Race Hub to another (if you have access to multiple Race Hubs, e.g. between the men’s and women’s if separate Race Hubs). They can also be copied from/to training camps.
- Open the race/stage which is the target for the waymarkers.
- If you want to import waymarkers only for a selection of the course then select that section in the top elevation profile.
- Click the “Waymarkers” button to show the waymarker list and then click the “Import” button:

- The Import Waymarkers popup will then be shown. If you had selected part of the course, a message (in blue) will be shown confirming that only waymarkers along this section of the course will be imported:

- In a seperate browser tab open the race/stage you that is the source for the waymarkers you want to copy and then select the full URL from the browser’s address bar and copy it to your clipboard.
- Back in the target route’s tab, paste the URL into the textbox in the Import Waymarkers popup and press the Get Waymarkers button.
- The popup will then show the title and date of the source race/stage along with the total number of waymarkers that are within 50m of the (selected section of the) target course:

- Pressing the “Import Waymarkers” button will then copy those 22 (in the example above) waymarkers to the target course.
Notes:
- There is no undo after pressing the Import Waymarkers button.
- Waymarkers are copied based on their proximity to the target course. It does not check to see if source course is in the same direction as the target course so you will need to manually check that the waymarkers make sense for the target course.
- You will also need to check if the distance checkboxes for each waymarker need updating if the times across the waymarker is different between the source and target courses.
Selection fine-tuning button map zooming
![]()
Previous when pressing the red, arrow buttons that allow the fine tuning of the current selection, the map would to zoom to show the full selection. I personally found this very annoying when trying to get the start or end of a selection to a specific location when I would have to keep zooming in to see if I had it in the correct place. I’ve disabled this auto-zoom when using these buttons. If you use the mouse on the elevation profile to add/change a selection then the auto map zoom is still enabled.
Note that if you hold the SHIFT key or ALT/OPTION key when clicking these red arrow buttons the selection will jump by a larger amount. This isn’t new but a chance you didn’t know this already 🙂
29th April 2024
Velon live rider tracking at the Giro d’Italia

Velon is providing the VeloViewer Live App access to their live rider data for the 2024 Giro d’Italia (and future races where they are providing live rider tracking). This will allow users from the teams competing to view their own riders’ live locations and stats.
As shown in the above image, during the race you will be able to see the initials/nickname of the riders on the map along with a side-bar on the left of the screen. The riders are grouped together based on their position in the race with distance/time gaps shown when the gap between riders is greater than 10 seconds. The solid black line between/below the riders will show your own location relative to the riders so you should be able to tell who is ahead or behind your location.
The age of the rider’s location determines how it is shown. This is the time difference between when the data was sent from the device on the bike and the current time of the Live app. This can vary based on the network connectivity of the Velon device and for the tablet/phone running the Live app. The data’s path is as follows (it doesn’t go via VeloViewer servers at all):
Device on bike > Velon Servers > Live App
In the Live app’s settings You will see two options:

- Rider tracking – Enables the rider tracking integration on the races supported by Velon.
- Hide rider when data > – Determines how old data must be before showing it differently.
The rider background colours mean the following (based on the above setting):
- Green – Age of the data is < 20 seconds and the rider is moving.
- Red – Age of the data is < 20 seconds and the rider is moving. i.e. new data is being received for same/similar location.
- Grey – Age of data is > 20 seconds. These riders are hidden from the list shown at the side of the map but will still be shown on the map.
Usually a rider will turn grey when their device is no longer able to transmit data or your Live app isn’t able to receive data due a lack of signal. 99% of the time in this situation the rider’s location will be stationary on the map as no newer data is being received. There is a small chance you might see grey riders moving on the map. This means the network is still working but is very slow so it is taking more than 20 seconds for the data to get from the rider’s device to the Live app. In recent testing it was typically taking around 3 seconds to get from the rider to the Live app.
Tapping on the rider list on the side of the map will open the following popup:

You have the option to “Track by rider” where you also need to select the radio/circle option next to the rider to pick which rider to track. The Live app location will then follow that rider’s location rather than your own.
The check box at the left of each rider row allows you to turn off the tracking of that rider. This will be useful if a rider has swapped to a spare bike and the tracker is now on a team car. You will still see the location on the map but that rider will not be shown in the rider list.
The data shown for each rider is as follows:
- Bib number – name (initial/nickname)
- Age of last location
- Power
- Cadence
- Speed
You can set the initials/nickname for each rider in the “Riders (for live rider tracking)” section at the top of your Race Hub. Best to keep them short so they don’t take up too much screen space.
8th April 2024
Further expansion on the route exporting options to now include a direct link to Garmin Connect to push routes (including waymarkers) to the users:

When first opening the Export popup, the black button will say “Connect GARMIN”. Pressing this will navigate to Garmin Connect where the rider will give permission for VeloViewer to push Courses to their Garmin account. This connection is linked up to the user in VeloViewer they are currently logged in with. This initial connection will only be required once. The route page will reload after the connection has been made but the route itself won’t have been sync’ed at this time so the Export button will need to be pressed again to do the export.
Once the Garmin account is connected, when the Export popup is opened the black button will now say “GARMIN”. Clicking the button will send the route (including waymarkers) to the connected Garmin account. The rider would then need to open Garmin Connect on their phone to pick the Course and send it to their head unit when needed.
7th March 2024
Updated file export from the routes page when you click the “FIT/TCX/GPX” button:

Wahoo devices have recently received an update meaning that they no longer support the waymarkers from TCX files. Speaking to Wahoo support, the fix is to use the FIT file format instead. I am now providing this FIT file download which will include the Waymarker information (still based on the “TCX” visibility option on each waymarker). This FIT file can be loaded onto the Wahoo units using either the Wahoo phone app or via USB cable.
Garmin will support both FIT and TCX file types but still require the use of a USB cable (copying file to the Garmin/NewFiles folder). The Garmin Connect phone app will still strip out waymarkers from both TCX and FIT files and may also overwrite the elevation data with much less reliable data. So if you’re using Garmin head units, use the USB cable to get the routes onto the device. Putting pressure on your Garmin contact to support “custom cues” from FIT files (or TCX files) via the Garmin Connect app might help. I’ve been asking them for years but the request coming from the teams they sponsor might have a better result!
17th February 2024
Flanders Classics introduced new “no parking” and “no parking/feed/tech” zones to most of their races. VeloViewer worked with Flanders Classics to see how these can best be shown to the teams and you will now see these in both the Race Hub and Live app:

Blue – no parking.
Red – no parking, feeding or technical assistance.
Toggling the “Parking” button on the left of the map will hide these blue/red lines. Clicking on the line will remind you what it means.
Flanders Classics have also provided the location of a few designated parking areas for team support vehicles which you will also see on the map.
5th February 2024
First off, a number of you will have already met over email my new employee, Rachel Davison. Rachel is the new VeloViewer Office Manager and has initially been dealing with all of the invoicing for the 2024 season. Rachel will also be taking on the processing of lots of the race routes to free up my time for writing more code! The new worldtour@veloviewer.com email address will come through to both myself and Rachel and we will deal with each email as needed.
Race Hub
New “Disabled” option against user in the Race Hub User section:

From the user’s perspective, being disabled on a Race Hub is the same as having been deleted. They can’t access your Race Hub or Live app. This Disable option will be useful for helpers that you only use at certain races so you can remove their access very easily but also add them back in equally quickly when needed.
Live app
For teams that have multiple teams sharing the same Race Hub, the Live app now shares the same option to filter the race lists by each of those teams:

Once set, the days races and the main route list will be filtered to the currently selected team. If training camps have had the team allocated then they will also follow this filtering. If a training camp hasn’t had a team allocated then it will only be shown when “All” is selected.
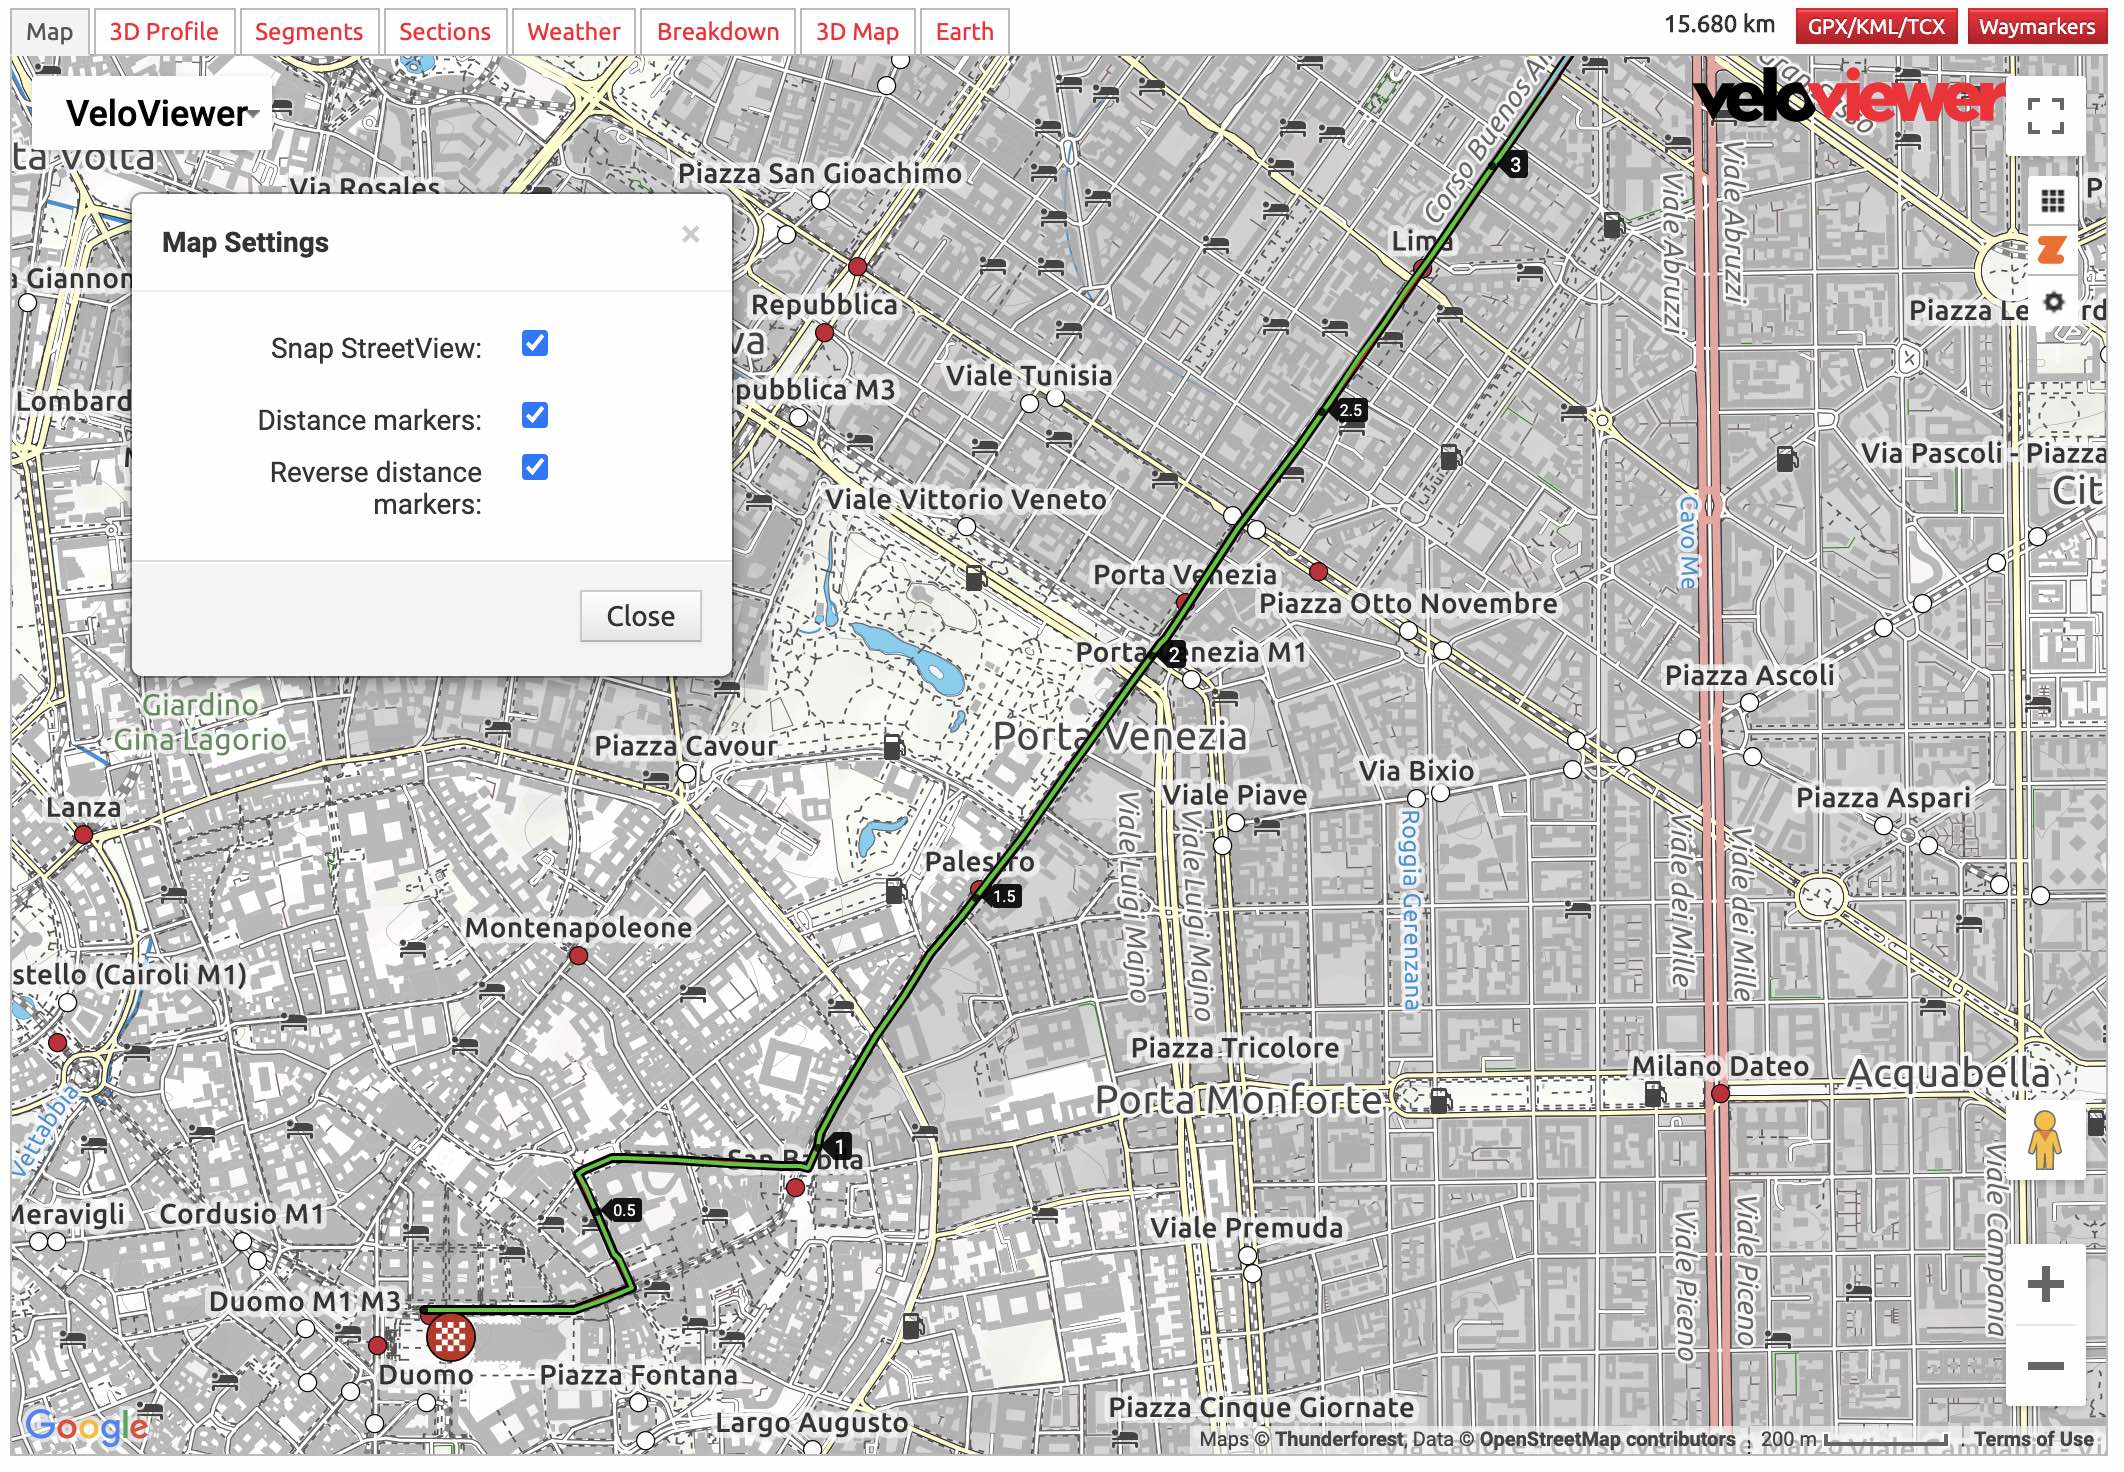
In the Live App settings you will now see a “Reverse map distances” option:

Once selected, the distance markers on the map will count down to the finish rather than up from km zero. The colouring of the distance markers now matches the colours you see in the Race Hub when using the equivalent setting in there:
- Black text on white background when counting up from km zero.
- White text on a black background for reversed.
A quick reminder about how to access that option in the Race Hub. Click the settings/cog button (bottom of the three on the right of the map) and you’ll see the “Reverse distance markers” option in the Map Settings pop up:

The Live app popup showing the information for all of your team staff sharing their location has also been updated to show a bit more information. This popup is opened when you tap on one of the user names on the map:

- This list is now filtered so you only see users who are within 50 km of the race route. You won’t see users in the list who are away at another race/training camp although you will still see those users on the map.
- The list is ordered by the distance along the race route.
- The Ahead column shows how far ahead or behind each user is compared to your location.
- The Estimated Time column is an estimated riding time, along the race routes for each location from your location.
- The age column is how long ago that location was shared by each user.
29th November 2023
For organisations that have multiple teams sharing the same Race Hub (Men’s Elite, Women’s, Conti/Devo), the creator of a training camp can now use the “Team type” selector to choose which team will be at the training camp. The gender icon will then be shown at the start of the camp’s name and the “U23” text for Conti training camps. These will now comply with the “All/Men/Women/Conti” filter showing above the Upcoming races list:

New prompt shown on the Live App main page to confirm the user agrees to obey all traffic and race rules while using the app. Once this has been checked then that is stored. If it isn’t accepted, routes will not open.

16th November 2023
Direct UCI calendar integration. The Race Admin page introduced this time last year was populated from data I managed to scrape together from multiple, non-UCI sources which was often incomplete especially with regards to things like the gender and age group of the race. Fortunately I now have direct access to the UCI’s data which includes reliable race categories (WE/WU/WJ/ME/MU/MJ) so I can now know for sure the gender and age category for each race.
I’ve just been through updating the 2024 calendar with lots of races updated to be accurately marked up for gender and age group.
I’ve also added the UGS (UCI Gravel Series) and CPTG (Cycling For All – Gravel) class of races along with gravel regional/world champs.
23rd March 2023
New waymarker types:
- Wheels
- Wheels+Bidons (which also includes the colour options for the bidon).
17th January 2023
Lots of teams now have multiple teams sharing the same Race Hub (e.g. Men’s & Women’s Elite + Devo) so the list of upcoming races can become quite long.
I’ve added a “My races” filter toggle which is visible to staff users (i.e. users that are not restricted, usually DS’s and coaches). This will then filter the upcoming races based on those where you have checked the “Receive updates” checkbox as shown in the image:

This isn’t available on training camps, just on races being processed by me (Ben VeloViewer) on your behalf.
If you’re not doing so already, checking the “Receive updates” option for a race means you will receive an email from me when the race is initially added to the Race Hub or when there are any changes to the routes.
You can also set the “Receive updates” for races that are in the “Planned races” section at the bottom of your race Hub which lists the races on your team’s calendar that I haven’t yet had any route info.
To receive updates you will also need to make sure your current email address is populated in the textbox at the very top of your Race Hub. Please check to make sure it is still the correct one.
9th December 2022
2 smaller updates today:
- Swapped over from DarkSky weather API to Apple’s WeatherKit. Apple bought DarkSky a year ago and is asking people to migrate across before they shut down the DarkSky API early 2023. You shouldn’t notice any difference!
- Live app – new “Flip view” option in the Live app’s settings which will flip everything from left to right and right to left. So if you want the waymarkers listed on the left of the screen you can now turn on this option to have that layout.
21st October 2022
Quite a big update this time as you all start thinking about planning your 2023 races. A new “Race Admin” page available to chosen members of your team to pick which races you want to see in your Race Hub.
Before going into the details of the new Race Admin page, the User Admin section available in the Race Hub to users with the User Admin role has been updated to allow Race Hub users to be set with the “User Admin” role and also with the new “Race Admin” role:

If your user has the “Race Admin” role then you will see a new “Race Admin” link just above the races in your Race Hub:

When opening the Race Admin page you will see a graphic at the top showing a calendar of your current set of races. This is followed by a set of filters and then the list of races for the upcoming season:

NOTE: Expect lots of changes as I improve the functionality based on feedback over the next few months!
The list of races is coming from the UCI and at the time of writing, a number of 2023 races don’t yet appear. I will add in placeholder rows for races that are missing so let me know if you spot any that need adding.
By default the list of races will be restricted based on the level of team(s) that your team pays for. i.e. if your Race Hub is for a women’s team then the default list will just include women’s races. If you are a national team then the default list will be the U23/U19 races. If you check the “Other” box at the start of the filters then you’ll see all of the races provided by the UCI list, most of which won’t be relevant to you!
If the “Distance” and “Elevation” columns are populated that means I have received some or all of the race’s routes and plotted them out. If not populated then I’ve not yet had any info, please send it over if you have it!
Clicking on the distance total link for a race will open a popup with the race stage details:

If this is a race you are able to add to your Race Hub then the dates will be links to let you view the route details. Therefore you’ll be able to see the course for races that aren’t yet in your Race Hub to help you decide if you should do it. I’m planning to let you view course for the previous version of the same race in here as well.
On the right you will see an “Attending” column and possibly also a “Team” column:

The “Attending” column lets you pick which races you have shown to the rest of your team in the main Race Hub. Picking “Yes” adds it immediately to your Race Hub (in the Planned Races section if no route info is yet available).
You can pick the “Maybe” option to mark up races as possible for your calendar without them appearing in your Race Hub at all.
Selecting “No” or “Maybe” will remove the race from the Race Hub if it was previously set to “Yes”.
These “Yes” and “Maybe” races then appear in the calendar graphic at the top of the page coloured to match that status.
If you see a “Request” link rather than a “Yes” button then this race falls outside of what your team has paid for. e.g. a women’s race if you’ve only paid for men’s elite and/or development teams. Clicking the “Request” link will open an email to me with the details of the race to add pre-populated. Just press send in your email client and I will add it in for you for the additional cost agreed at the start of each season.
The “Team” column is only shown if your Race Hub is set up to include races for both your Elite and Development team. The “Elite/U23” button toggle is then shown on races that could be applicable to both teams so you can specific which will be doing the race. This isn’t shown for WorldTour or U23 races.
The plan will be to allow the filtering of races in your Race Hub so you can just view, for example, the development team’s races. Of course this only applies to teams that have a single Race Hub with multiple teams.
1st September 2022
New “Race Log” / “Journal de course” waymarker type added. This will let you log an event happening in the race using the Recon mode in the Live app that you can come back to after the race. You could log things like the locations of:
- Crosswind splits
- Crashes
- Breakaways
You would add the waymarker at the location and add text to describe what has happened.
Currently it is just provided as a new waymarker type accessed in the same was as any other type. When looking in the Race Hub after the event these “Race log” waymarkers will be shown on top of any other waymarkers to make them more obvious.
22nd April 2022
Race Hub route view – automatic hiding of map waymarkers when selecting a section of the route. Only the waymarkers included over the selected distance will be shown. This will be particularly useful when the route goes back over itself in one direction or the other as it will highlight waymarkers that don’t have the correct distances selected/unselected.

e.g. In the above example where the route takes this road in both directions over the stage, selecting the 86 km to 89 km section highlights that this “Left” waymarker is incorrect. In the list on the right it can be seen that both the 33.91 km and 87.36 km distances are selected but only the 87.36 km option should be deselected (and ideally an additional “Right” waymarker is added at the same location with only the 87.36 km option checked.
This scenario was hard to visualise previously but should be much more obvious now.
30th March 2022
Wind map
In the top left of the map when viewing a route from the Race Hub you will see three new options:
- “Gradients”: The default view showing the gradient colours on the map route line.
- “Wind”: Replaces the route line gradient colours with the colours shown above the elevation profile to represent the risk of peloton-splitting crosswinds:
- Red: Cross and cross-tailwind.
- Orange: Cross-headwind.
- White: Headwind, tailwind or just light winds from any angle.
- “Waymarkers”: Toggle on/off the waymarkers on the map. Button was previously at the top of the waymarker list.
When using the “Wind” option, arrows are also shown on the map showing the wind direction and strength (white arrow for light wind going through to black for stronger wind). These show the wind forecast across the map for the time of day corresponding to the current position of the marker on the elevation profile:

8th March 2022
Race overview maps
Below the stage list for each race in your Race Hub you will now see a “Race overview map” button which will open a popup showing a map of all the stages of that race:

11th February 2022
Opting in for email notifications for race route updates
Only for users with full access, restricted users will not see these features. Knowing who to notify and how to notify them when routes are updated has always been an issue for me so I’ve built in functionality into the Race Hub to opt-in to receive notifications for each race and provide your current email address. After I’ve made a change to a course I’ll generate an email to everyone who has opted in to receive them with the details for the change.
At the top right of your Race Hub you will see a text box for you to enter your current email address. There is a chance this is already populated in which case just check that it is still the best email for you:

When you expand the stages for a race you will now see a “Receive updates” option below and to the right. If you check this then you will receive any updates for this race. It will also show a 🔔 next to the race name to make it clear which races you have selected:

Make sure you add veloviewer@gmail.com to your email contacts to make sure the notifications don’t go into your spam folder.
Planned races still waiting for details
Another new section at the bottom of your Race Hub is called “Planned races” which lists the other races I have down to be in your team’s season which I haven’t yet had any course details. Previously all of this info was stored only on a spreadsheet and often would become out-of-date without me knowing. Let me know if any races are missing, if any dates change or if your team is no longer planning to do a race listed.
This list also has the “Receive updates” option so you can opt-in be notified when the details become available along with any future updates:

17th November 2021
Live app new setting:
- “Reverse distance scale” – determines the direction of the distance markers on the scale at the bottom of the Live app. Defaults to being reversed (i.e. showing km’s remaining). Changing the setting will show the distances counting up from km zero.
Any neutral will now also be shown as a dark section in this distance scale.
12th November 2021
New waymarker types
- Team Parking
- PPO
- Anti-doping
- Pavés/KOM Start – For those Belgian style climbs where the climbing and cobbles start at the same location you can use this waymarker. Works in the same way as a standard KOM Start in terms of working out the length of the climb and the average gradient but also shows as pavé in the profiles (see below).
- Town – used to highlight the entrance to a town.
The first three waymarker types do not display in the waymarker list on the side of the Live app but do show up on the map. They also default to not be included in the TCX file. When I’ve been testing on Garmin and Wahoo devices, if the parking/anti-doping waymarker are included in the TCX file and are off the side of the course then they still appear in the cue-sheet list which might be confusing. I couldn’t find a way to have them show on the GPS devices map without also showing up in the cue-sheet. You can also choose to include them in the TCX file to test it out.
Live app
Bottom profile changes

Pavé and gravel sectors will now show up as grey bars at the very bottom in the distance scale showing where each sector begins and for how far. Note that you need to use the “Sector end” waymarkers at the end of the pavé/gravel in order for this to work correctly.
Also, the yellow “Bonus Sprints” will now show up in this bottom profile as well as the green “Sprint” waymarkers.
New setting
New setting to use live app using miles/feet instead of km/m as requested by the UK Police.
Race Hub
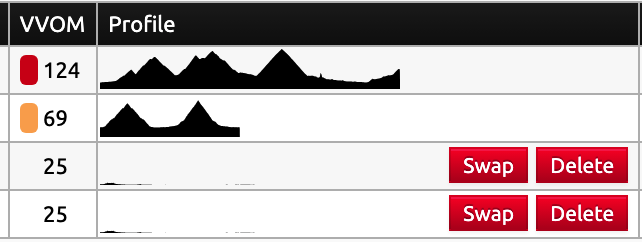
I’ve made a number of enhancements to the “VV” profile graphic when viewing races. This is shown when the “VV” option is selected on the “3D Profile” tab:

The main changes are:
- The addition of highlighting pavé and gravel sectors (make sure you use the “Sector end” waymarkers).
- Options (below the graphic on the right) to alter the distance axis to allow the following:
- Overall distances – when viewing a selection, this determines if the distance scale is relative to the overall stage or just to the selection.
- Reverse distance.
Here is an example showing both pavé and gravel sectors:

15th September 2021
Waymarker handling for users belonging to multiple teams
There are a small number of users that belong to multiple teams (e.g. professional team and a national team) and sometimes a user can have full (DS level) permissions in one team and restricted permissions in another. This has been a tricky one to handle properly so if you come across any issues then please let me know!
In the Race Hub you will now only see waymarkers/POIs on a race route for the team whose Race Hub you opened the route. e.g. if you were viewing the British Cycling Race Hub and open the Worlds Men’s RR you will only see waymarkers added on the British Cycling view. You will not see waymarkers added by people viewing the race from (for example) the Ineos Race Hub. So if you want to add waymarkers on a race route for a particular team then make sure you open it from that Race Hub.
In the Live app there is now a drop down on the main menu in the top right if you belong to multiple teams:

Everything you see and do in the Live app will be in the context of that team. Changing the team will cause the Live app to reload in the context of the chosen team.
If you only belong to one team then you shouldn’t notice any differences at all.
Live app compact mode
This is a new option found in the Live app settings to make the Live app display clearer when used on phones. This was added in primarily for when the Live app is being used on motorbikes by police/marshals but may well be useful to others. When enabled (and used on a small device in portrait mode) the map or waymarkers will display full screen with a toggle button in the top left to switch between the two views. Rotating the device to landscape will show the normal layout:


10th May 2021
New “Central Island” waymarker type added:

25th March 2021
Very useful Live app location setting on iPad/iPhone – I don’t know how long this has been available but I’ve only just spotted it. If you are using the Live app on iPad of iPhone then you will probably be prompted to allow access to your location each day when you use it. There is a setting now available that lets you allow access permanently.
- Settings > Safari > Location > Allow
Colours for Bidons waymarkers – You now have the ability (in the Race Hub only at this point) to set the colour of each “Bidons” waymarker. I’m using the browser’s built in colour picker which means it looks different depending on which browser you are using:


These coloured bidons waymarkers will then also be shown in the Live app. Currently you can’t edit the colour in the Live app and any bidons waymarker added in the Live app will be the default blue colour. I’ll work on allowing the setting of the colours in the Live app next week.

One further update was related to fixing an issue when viewing Race Hub routes on an iPhone which was causing the page to crash and reload when using StreetView. Hopefully that is fixed now.
17th March 2021
A number of changes to the Race Hub and Live app:
Race Hub:
- New elevation gain calculation: The way total elevation gain is worked out has been tweaked to try and line it up better with the recordings from riders. I looked at the recent rider Strava uploads for Paris-Nice and saw that my elevation totals were coming in a bit low. This will be because for the last few years I have been needing to smooth the elevation data coming from Strava to remove the noise it used to include that resulted in the crazy high elevation totals you see on some route mapping software. Strava reworked their elevation model some time ago resulting in much smoother, more reliable elevation data and hence more reliable elevation totals. I’ve reduced the smoothing significantly in VeloViewer and now the resulting elevation totals look to match up much more reliably with the uploads after the race. I’ve been through the rest of the races already in the Race Hub for this season making sure the elevation totals are calculated using this new logic.
- Elevation gain for selection now displayed: I’ve tweaked the data shown in the grey box when selecting a section of the route. As well as showing the length of the selected section and the average gradient, the middle number is now the total elevation gain for the selection. e.g. 877m of elevation gain over the length of the selection.

- Copy lat/lng to clipboard: When your right click on the map and the “Add Waymarker” popup is shown, it will now also include a button saying “Copy lat/lng”. This button is also shown in the smaller popup when you click on an existing waymarker’s icon on the map. This will copy the lat lng to your clipboard in the format “53.3256, -1.5462” which you can then paste directly into Google Maps search box to get directions to/from that location.
Live app:
- Bug fixed for iPads that were showing two sets of text in the distance from start/distance to end boxes. Some strange issue with Safari not redrawing the screen correctly but I hope I’ve found a workaround.
2nd March 2021
A number of performance and accuracy updates:
Race Hub:
- The way in which elevation’s are corrected has been changed to leave the original lat/lng positions for the stage and interpolating the corrected elevations along the segments being replaced. We’ve been working on this one for ages as it is pretty complicated and wanted to make sure it was right. Previously when the elevation was corrected for a segment on a race route, both the elevation and lat/lng data were replaced with the data recorded on a barometric GPS device. This would sometimes suffer from lat/lng errors in the recording resulting in the lat/lng values not following the roads perfectly. Now the route will always follow the roads with just the elevation data being corrected.
Live app:
- Major rewrite of the way waymarkers are listed for performance reasons. It should look identical as to how it did before, but just run quicker when redrawing.
- The waymarker list should now only show a single waymarker that you have already passed. Previously it would show any waymarkers up to 500m before your current location. It still has the 500m limit but now only the last one will display so you can see more of the upcoming waymarkers.
- Map tile count / storage warning. Previously if you didn’t occasionally clear out the saved map tiles (in the Live app’s settings) the Live app would eventually run out of storage space and just not let you save any more tiles without even throwing an error. I’ve now manages to work out how to catch the error although it works slightly different depending on which device you are using:
- Android – Chrome has the built in ability to check the amount of storage space remaining. Once you have used over 80% of the storage space for map tiles you will be prompted to head to the Live app’s Settings page and clear the saved tiles. If you don’t do this then it should continue to save tiles for a few more races.
- iOS – Safari doesn’t have any way to check the remaining storage space so the first my code knows about it is when it tries to save a tile and it fails. When this happens you will see a message asking you to clear the currently saved map tiles in the Live app’s settings. You won’t be able to store new map tiles until you have done this.
Both Race Hub and Live app:
- I noticed that something had gone wrong with waymarker descriptions where letter accents or special characters (like Emojis) were used. Not all the time but some of them were not being stored/displayed correctly. I’ve hopefully fixed the code to save them and retrieve them correctly but there may be some which have been stored in the incorrect format. If you see a waymarker description that is showing up incorrectly then please re-enter and save it. Let me know if that isn’t working.
23rd October 2020
Race Hub changes:
- Option to view the map distance markers in reverse (counting down to the finish).
- When reversed the markers will be white text on a black background, when not reversed they are black text on a white background.
- When reversed kms 1, 2, 3, 5 & 10 to go are shown slightly larger.
- To choose this view press the map settings button (the button with the cog icon near the top right of the map) to change the “Reverse distance markers” setting.
8th October 2020
Live app changes:
- I’ve noticed that the Velon data feed intermittently has the speed being falsely reported as zero for riders when their lat/lng positions are still showing as moving. I’ve changed my code to ignore the speed provided by the Velon feed and calculate it myself to avoid false reports of riders stopping (being shown in red).
12th August 2020
Race Hub changes:
- New “Waste zone”/”Zone de collecte” waymarker/POI type added.
- Velon icon is now shown against each stage where the data is set up (previously only shown at the race level). Mainly for my own use to see if any stages are missing an id for the live tracking from Velon (e.g. Tirreno currently does after the addition of the new stage).
Live app changes:
- New “Waste zone”/”Zone de collecte” waymarker/POI type added.
- As in the Race Hub, Velon icons now displayed at race and stage level in the route list.
- When map direction set to “direction up” and you are heading to the start, there was an issue that the map would occasionally rotate incorrectly. I’ve reworked this so it will now rotate the map so it is oriented from your current position to the routes start.
19th March 2020
A few more changes to the Live app:
- View the shared locations of other Live app users on you team.
- Elevation info added into the lists.
- Distance remaining scale added.
- Emoticons and special characters now supported.
- Rework of offline storage of app.
1. View shared locations
Important: This requires your teams’ users to be using unique Strava logins. Only a single location is stored and shared for each Strava account. If you have users that currently share a login then they will need to be set up in your team’s user admin with their own Strava accounts.
Also, your location is only shared when you have the Live app running. Once you turn your phone/tablet off or swap to a different app, it will stop sending your location until you load it back up.

You will now see the names of the other users on your team that are using the Live app on the map at their last shared location. You can see the two users “Simon” and “Ben” shown on the map above.
Tapping on one of the names displays a list of all of the users that have shared their location in the last 12 hours (users that haven’t shared their location more recently will be hidden). The name of the user, the age of their location along with the distance along the current course is shown (note that if the user is off of the course, the distance shown will be the closest point along the course to their location).

If you have two races going on simultaneously you will currently see all of the users sharing their location for both races in this list. If this is really annoying then please let me know and I can look into hiding users that are over a certain distance away from the course.
The settings for the location sharing are found at the top of the Live app’s settings page:

- Share Location check box: Determines whether your location is shared with the rest of the team. You can have this turned off but still view other people’s positions.
- Shared Location name text box: This is the text that appears to other users on their maps. Make sure it is not the same as someone else’s!
- Location frequency: Pick how often you download the location of your team’s shared locations. If you have the “Share location” check box checked then your location will also be shared each time the locations are fetched.
My recommendation would be to have the frequency set to 5 seconds so the team helpers have a clear view of the approaching team cars and riders.
Track by user
This is a great option if you aren’t in a team car behind the race. If you tap on user’s location to get the popup list (shown above), check the “Track by user” option and pick one of the team cars. The Live app will now display all of the information from the perspective of the location of that car. If you are at the roadside further up and have added a waymarker for your position then you’ll get a distance count down to your location.
Remember that for races that support live rider tracking, you can also click on the rider list on the left of the Live app to see a similar popup and choose to “Track by rider”.
2. Elevation info added into the lists
Both the Main Menu and the Route List have been altered to include the elevation total for each race/stage. The layout has been changed slightly to make the stage list items taller to make them easier to hit, especially if you are using a phone.
3. Distance remaining scale added
As you can see in the images above of the Live App map, beneath the elevation profile at the bottom of the map, the remaining distance is now shown as an x-axis.
4. Emoticons and special characters now supported
Previously I had made sure that you could use special characters like accents àêß etc. but other special characters would not work. I’ve extended the code to handle all special characters including emoticons 🤓 The main reason for this is to allow the use of arrows in the descriptions: ←↑→↓ Note that Wahoo and Garmin devices will show these simple arrows in the waymarker descriptions but will not display more complex emoticons.
5. Rework of offline storage of app
This is a big one (for me) but hopefully you won’t notice any difference. Browsers were set to stop supporting the way I stored the code of the Live app to allow it to work offline so I’ve migrated it over to the replacement method. The only change you’ll see is that after I apply new updates in the future you’ll be shown a message asking you press a button to reload the app.
18th February 2020
A number of changes in the Live app for you. A fairly small one providing a new option for the map’s direction, a number of modifications to the speed/time-cut popup and the one lots of you have been waiting for… live weather! As with all things VeloViewer, hopefully it is all really intuitive and just works as you’d expect but if you’d like to know all the details, please read on…
New Map Direction
I’ve added a new direction option for the map in the Live app which hopefully will be more like a traditional SatNav: “Direction up”. These are the three options you now have available:

- North up – always have north pointing up.
- Direction up – (the new one) works out the direction of the next 50m of route ahead of you and rotates the map to point that upwards, positioning the map so your location is always in the centre and down a bit to hopefully give you the best view of the upcoming route.
- Best fit – as in earlier versions, this option displays the full zoomed distance rotated to have your current position at the bottom and the route filling the map.
Weather in the Live App
This has been on the to-do list since day one but it required lots of things to be in place before I could add it in. It is also a lot more complicated to implement than you might think!
Of course in order to get weather information your tablet must have internet access during the race. Every 15 minutes it’ll check for any updates to the forecast. I use DarkSky for the weather info which is the same source as the weather info you see in the Race Hub. It is also the weather source for the excellent EpicRideWeather app which also links directly to your Race Hub to give you great, full stage/race weather overviews.
Note: Weather in the Live app is only designed for use on the day of the race. If you are doing a recon of a route then it’ll show the predicted weather for the race day a long as it is within the next 7 days.
Wind waymarkers

If you’ve added wind waymarkers to your route then the normal wind icon will be replaced in the list with a wind direction arrow (wind direction is relative to riders’ direction of travel at that location) and the wind speed. If you have added custom text to the waymarker then the windspeed is still shown above the text (e.g. the first of the two in the image above).
The colour of the arrow is the same as that used in the Race Hub. Orange means cross-head-wind. Red means cross to cross-tail-wind. Clear for block head or tail-wind.
Waymarker popup

If you click on any waymarker (not just wind) it’ll show the expected weather at the waymarker’s location at the estimated time of arrival (please see “Recon mode vs normal mode” below for more details on this time estimation). Remember that the temperature shown is the “Feels like” temperature which takes into account windspeed and humidity.
Weather for any point along the route

Tap anywhere along the route and the popup now has a new, 3rd line showing the weather info for that location at the expected time of arrival.
Current wind direction/strength

A new addition to the speed/elevation/VAM bar in the top left of the screen is the current wind direction and speed for your current location along the route. The direction arrow is shown relative to the current map rotation, it is not relative to the direction of travel of you or your riders. e.g if your map is North Up and the wind direction is from the West then the arrow in this section will stay pointing from left to right no matter your direction of travel. It is always shown in black.
Recon mode vs normal mode
The weather forecasts are given for the estimated time of arrival at each location. This estimate is based on the start time and an estimated speed. This works a bit differently depending on if you are in Recon mode or not.
Recon mode: Most users in this mode will not be following the riders along the course so the km zero time set in the Race Hub (which can be overridden in the speed popup described below) is used and the time along the route is estimated from that point onwards.
Non-recon (i.e. normal) mode: If you are in this mode then you are probably following the race in the car. The estimated time for each weather forecast is based on the current time and your current location along the course rather than the km zero time. This should provide more accurate estimated times when showing forecasts for points further along the course.
Speed/Time-cut Popup Changes
Tapping on the speed/elevation/VAM/wind section at the top left of the Live app opens the speed/time-cut popup:

The Time-cut section has been split off into its own tab and works as it did before.
You will now find the following new fields (note that changes made to any of these values are not shared with other Live app users but just stored within your Live app):
- 0km location – this lets you override the length of the neutral set in the Race Hub. Pressing the “Here!” button sets km zero to your current location so have this popup open as you approach km zero. The location can’t be set to a point before the mapped route starts. Note I’ve purposely offset this button to make it less likely that you will press the wrong button by accident.
- 0km time – this lets you override the 0km time set in the Race Hub. This time is then used for working out the weather forecasts for points along the course and is also used to work out the elapsed time and average speed. Pressing the “Now!” button sets the 0km time to the current time so press that when you hear the race get underway on race radio.
- Average speed – The first value is the average speed for the whole race based on the 0km time, the current time and your current location along the route. The second value is the average speed for the last hour (or less if you haven’t yet been going for an hour).
- Elapsed time – This is the time since 0km time. Pressing the “Set winner’s time” button will populate the winner’s time field in the time-cut calculator with the current elapsed time.
7th February 2020
Race Hub user administration added. One or more users of your Race Hub can be set up as administrators to allow them to add, edit and remove users’ access for your team:

This new section is only visible to users that have this new permission.
Press the “Add user” button and then enter the Strava number for the user you want to add. This number is in the URL of the user’s Strava profile page but it is probably easier to get them to visit https://veloviewer.com/check as once they have connected their Strava account to VeloViewer, this page will display their Strava number. They can then email that number back to you and you can add them in.
If the user has an alias instead of their real name in Strava then you can optionally add their real name so you can remember who the account belongs to.
You can also set the “Restricted” access option for each user for users (typically only the performance staff would have full access which allows them to add waymarkers for the whole team to see as well as setting up training camps).
6th December 2019
New weather features in the Race Hub (I’m currently working on integrating similar weather features into the Live app).

- Top right grey box – shows the weather forecast for the cursor location on the top elevation profile. Move you mouse along the elevation profile to see the expected weather at that location:
- Rough date/time for that location on the race.
- Icon showing weather e.g. partly cloudy, rain etc.
- Temperature – this is the “apparent”/”feels like” temperature which takes into account humidity and wind strength.
- Wind speed – general wind speed rather than speed of gusts.
- Wind direction – blowing in direction of arrow where North is up. In the example above the wind is blowing from West to East.
- Two horizontal lines above the elevation profile:
- Grey/blue line – shows cloud cover and rain intensity. If you see no grey/blue line then it should be sunny!
- Orange/red/white line – shows the wind in terms of risk of echelons. White is a headwind or tailwind, orange is a cross headwind and red is a cross to cross tailwind. If the wind drops below 15 km/h then the red/orange begins to fade and disappears once below 10 km/h. I will probably alter the range to also take into account temperature, air pressure & humidity as well as speed to better reflect the “punch” of the wind.
- Arrow above the two lines shows you the wind direction as it hits the riders at that location. Coloured in the same way as the red/orange line. In the above example the arrow above the elevation profile is pointing from the bottom right meaning the wind is a cross-tail wind from the right at that location. Note that the riders are heading towards the South East at that point on the course as you can see on the map with the wind coming from the West.
- Arrow next to the current location on the map – coloured the same as the arrow above the lines but showing the wind direction compared to the orientation of the map.
- Two new fields at the top of the Waymarkers list:
- “0km time” – the time at which the race is expected to cross km zero. This is stored only once and used across all the teams (in the same way as the km zero location). For TT’s you can change this time to each rider to see the expected weather for their start time but just don’t save it.
- “Speed” – I work out a rough time for all the points along the route based on the start time and a scale of speed-to-gradient taken from previous race recordings. Use this slider to see what differences that might be if the race is slower or faster. Note that the speed slider value isn’t stored.
- Below the two fields in the Waymarker list is some summary info:
- Average speed (based on the speed slider).
- Min – Max temperature along the route.
- Percentage chance of rain.
The weather forecasts are updated every hour and will show for up to 7 days in advance of the race day.
The cross-wind warnings don’t take into account the topography, trees, built up areas or anything else that might mean the wind isn’t an issue. So use the orange/red areas as a guide to help you look for the most likely areas that will be affected by the wind and then use StreetView to check if it is exposed or not.
9th October 2019
Added in a Velon logo next to the race name in the Race Hub when the race has live Velon rider tracking. You will need a Velon username and password available from Mark Coyle which you enter in your Live app settings in order to see this data.
22nd August 2019
Recon Mode for users with restricted access.
Previously, in order to add waymarkers in the Live app you had to be a user with full permissions (i.e. not a rider or helper) as we don’t want people accidentally undoing all of your hard work of adding waymarkers before the race. The Recon Mode was designed to allow someone in an avant course vehicle on the day of the race (or someone driving the course further ahead of the race) to easily add in waymarkers as they go.
The obvious next step was to allow the staff helpers to add waymarkers showing their own location but without giving them the ability to alter any of the existing waymarkers. This is now available.
For users who have restricted access, they will now see the “Recon Mode” option in their Live app’s settings along with a text box which lets them set the default text to use as the description for a new waymarker. Most likely they would add in their name:

These users will then see the “Add Waymarker” button at the top of the waymarker list which lets them add a waymarker at their current location. Or they can tap the map and use the “+” button shown at the top for that position.
I’ve limited the types of waymarker available to just “Bidon” and “Feed”. Let me know if you think they should have more options. Perhaps we need a specific “Spare wheels” type as well?
When they add a waymarker, the description text will default to the value set in the Settings (if set) but they can still edit it as required.
These users are able to move, edit or delete their own waymarkers but not those created by anyone else.
Please get in touch if you want to give more users access to the Race Hub and Live app to use this new feature or if you want to change anyone’s permissions.
11th July 2019
StreetView snapping:
There are two ways to get the StreetView man to a position along the course:
- Hold the Control key down on your keyboard while you move the mouse over the top elevation profile. If you stop moving the mouse over whilst over the elevation profile (while still holding the control key) then StreetView will be opened and the man will jump to that position along the course… as long as StreetView imagery is available for that location.
- Manually dragging the StreetView man to the desired location.
Previously, this second option would just open the StreetView at the location the man was dropped but that often missed the course. Now, when you drop the StreetView man, it will automatically jump to the nearest location along the course itself which should make your life a bit easier.
You can turn off this StreetView snapping in the map settings (the button with the cog to near the top-right of the map).
29th June 2019
The new “Recon mode” is now available in the Live app which allows users to add, edit and delete waymarkers directly in the Live app. This is only available to users who have the permissions to add team-wide waymarkers in the Race Hub.
Turn on Recon mode in the Live app’s settings to see the buttons to add new waymarkers and the additional options to edit, move and delete existing waymarkers.
Please watch this video for a run through of how it works:
10th May 2019
Live app changes. In the route info popup (shown when you tap the current speed/elevation/VAM box in the top left corner) I have added:
- Climbing remaining: Shows the total number of metres climbing left on the stage/race from your current position
- Time cut calculator

Time cut Calculator
When you enter the winning time and the percentage value, the time cut will be calculated and shown as shown in the image above.
If you don’t hear the winning time over the race radio then I would recommend going to ProCyclingStats.com where you will see the day’s race results on their homepage. Alternatively the usual sources on Twitter (e.g. Inrng) post the results as soon as they are shown on TV as well.
The distance field will populate with the length of the stage (as shown on VeloViewer) and the average speed will be calculated once the winning time is entered. Please note that the distance can be a bit different to that used by the organiser due to different methods of calculating distances so you can override that value if necessary.
Once you know the average speed then you will need to consult the race’s road book in order to work out the percentage being used for that stage.
8th May 2019
Live app changes:
- Tapping on a waymarker on the map now opens the waymarker popup info.
- Waymarker popup info now also shows the distance from your current position.
- Waymarker list auto scrolling is now disabled if you have the “lock on position” button (bottom right corner) unchecked. When unchecked this button also lets you scroll the map without it snapping back to your current location. If the “lock on position” button is selected then, as well as the map snapping back to your location, the waymarker list will also auto-scroll to the current position after 10 seconds.
- Waymarkers are now auto-scrolled off the top of the list when you have gone beyond 500m past the waymarkers location. This lets you see the waymarker information for a little longer. Note that you can always scroll the list down with your finger to see waymarkers that you have already past.
29th April 2019
Ordering of races by “last added/updated” date
Hopefully you will have noticed that beneath each race I show a date when I received the files for the race along with a description as to the source of the files. I also add text to show when I have received updated files with changes to the course sometimes with links to images of the change in the route if it is significant/important. I’ve now added two ordering options, either by the race start date or by the date the routes were added/last updated:

Note that the earlier I get the files for a race, the more likely that they’ll be subject to change.
ASO/Vuelta files
One of the teams has been good enough to set me up on their ASO portal account so now I can download the KMZ files myself for all of the men’s and women’s ASO races which I’ll do once a week and make any required updates. ASO also add the main waymarkers (KOM/Sprint/Feed and KM zero location) into their KMZ files so I automatically add these to the routes as well once they are available.
I’ve also got access to Kiko’s Vuelta routes so I will do a similar check/update for those as well.
25th April 2019
Three updates when viewing routes from the Race Hub:
- A new “You only” option is provided alongside the “Live” (show in Live app) and “TCX” (include in the TCX file export) checkboxes for each waymarker/POI that your user has created. If selected then only your user will be ale to see that waymarker/POI in the Race Hub and in the Live app. So if you have multiple DS’s/coaches working on a race and one wants additional waymarkers/POIs that the others don’t need then these can now be added in.
- New “Save all” button added to the popup when editing waymarkers/POIs which saves all changes to waymarkers/POIs and the km zero location in one go.
- The left/right arrow buttons that can be used to move the start and end points of the current selection (shown in the image below) can now be used to jump the start/end points of the selection by 250m or 500m in a single click. Just hold the alt key down when clicking to jump by 250m or the shift key to jump by 500m.

17th April 2019
The GPX/KML/TCX export button has been updated to no longer simplify the number of data-points. This was done previously to keep the file-size smaller to avoid limitations of the browsers for these dynamic file downloads. I’ve found a slightly different way to do it that seems to avoid this limitation.
A couple of things to note:
- iOS browsers seem to work slightly differently but I’ve coded it up to handle those.
- iOS Safari doesn’t support the filenames on the file downloads (it saves the file as “unknown” and without a file extension so it won’t let you open it directly in another app (e.g. Wahoo Elemnt app). If you use iOS Chrome instead then it’ll download with the correct filename and let you open directly in another app.
25th March 2019
- Date and source of race information added below each race in the Race Hub. Race organisers will often make changes to the routes on the run up to the race so if the date shown for the latest information used is more than a few weeks old then it would be worth checking with the race organiser to see if there have been any changes and send me the latest GPX/KML/KMZ files.
23rd March 2019
- Live app bug fix – when tracking by a Velon live tracking rider the view would flick between your own position and the riders position. This is now fixed.
7th March 2019
- New waymarker types in Race Hub and Live app:
 Railway crossing.
 Straight ahead.
- Average gradient now shown alongside the distance when tapping two points along the route:

1st February 2019
- Gradient averages in upcoming profile. The size of the sections being averaged varies depending on the distance you have chosen in the bottom right of the page:

- Current speed, elevation and VAM (rate of vertical ascent in metres per hour) shown in top left corner. Tapping on this area will open a popup showing the average speed for the last hour:

New additions prior to 2019 have not been itemised, sorry!