 Hopefully lots of you will have seen the 3D profile images being showcased on Eurosport throughout the Tour de France coverage this year. I have now massively improved the way you can get hold of your own 3D profile images of rides, runs or segments to make it much easier for you (as well as me) to attach to your Strava activities or share on social media from your phone, tablet or PC/Mac.
Important – Please don’t crop out the logos on the images and read and adhere the T’s & C’s if you want to use them for commercial purposes. If you’re wanting to use on a blog/website then see below about using the interactive embed code rather than an image.
I’ll show an example of getting an image to share on Instagram using an iPhone but the way you get the images on a PC, Mac or tablet is identical.
You can of course just share the link to one of your activities (make sure your data is public if doing this) or to a segment on Facebook or Twitter and the 3D profile image will be shown by default. However in Twitter the reader will have to expand the tweet to see the image. So if you want to keep your data private but still post your image to Facebook or want to get the extra punch of an image immediately visible in people’s Twitter timelines then you’ll need to manually attach the image.
Step 1 – View the 3D profile
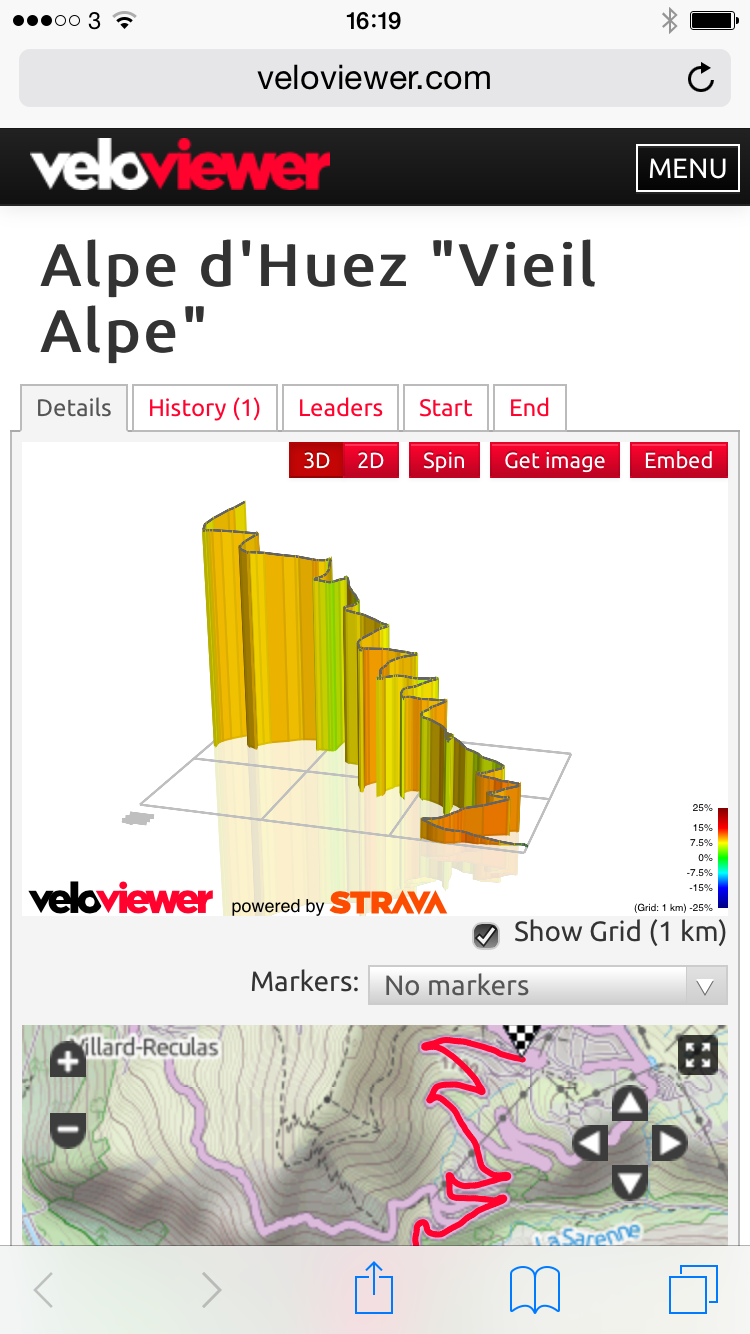
- Navigate in VeloViewer to the activity or the segment of interest (I’m working on adding the Wheel to this list).
- Perfect the profile:
- Choose between 3D and 2D.
- Spin it to get the best angle.
- Set any markers (e.g. distance or gradient).
- Stretch the elevation as required (but don’t go crazy, Box Hill is never going to be the Angliru!) (not available on phone).
- Set how simplified you want the profile (greater the simplification the less detail you will see in fluctuations in gradient)(not available on phone).
Step 2 – Get and Save Your Image

- Click the “Get Image” button.
- Pick the desired image size/shape from the drop down (square available for Instagram).
- Click “Generate Image” button if changing the sizes/shapes.
- Long touch or right click image and save to your device.
Step 3 – Share on Strava and Social Media
Whichever social media is your preference the steps should be fairly familiar to you – just find the image that has been saved and attach it to you your post/tweet. Or if you are wanting to attach the profile to your activity in Strava then open up the Strava phone App and attach it from there.
Please do tag your Posts/Tweets with @VeloViewer
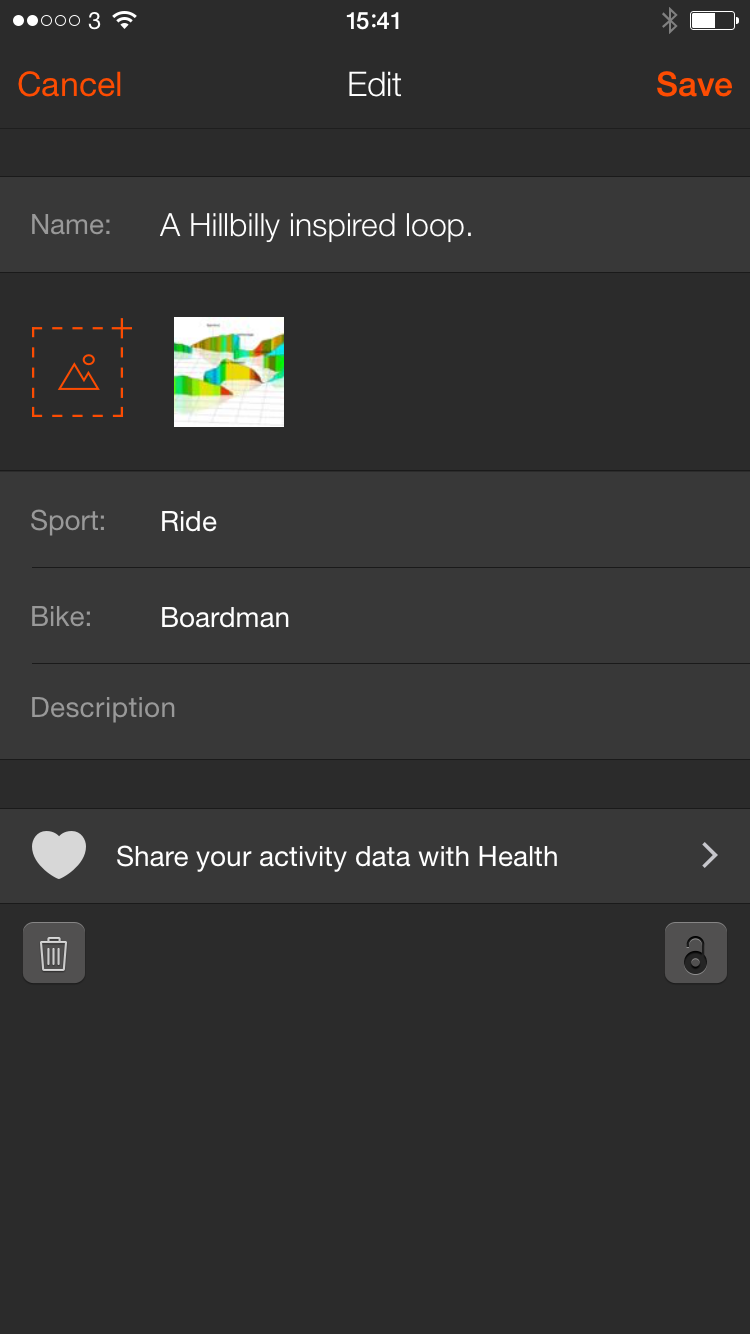
If you’re wanting to attach your profile to your Strava activity then just open the Strava App on your phone (I don’t think you can do this on the website), view your activity and press the edit button. Here you will find the options to add your newly saved 3D profile.
Embedding Interactive Profiles
If you want to show profiles on your own blog/website then please use the “Embed” button to grab the code for the interactive 3D profile. Very easy to do and it is responsive to cope with any type of usage and the best thing for me is it includes all of the links back to my site.
If you are wanting to do this for an event like a race or sportive then get in touch and I can make sure your profiles are as good as they can be.
athlete/381555 says:
Hi Ben,
I love your profiles, but is it correct that my plans for rides (e.g. strava routes) can not be visualized in profiles? I would like to make (3d) profiles of the route plans I have for my mates coming cycling holiday, but I think your profile generator does not accept strava routes or .gpx? Otherwise, do you know a worthy alternative since mesmeride is down?
Ben says:
Just updating this reply (24th September 2020). You can view your planned routes in VeloViewer (under the Routes tab) and then view the 3D profiles and embed them on your site. If you just have a GPX file then you can load them into this page: http://veloviewer.com/routes/0
Shyam Suyambu says:
Hi Ben, is this feature removed? The link takes me to an error page.
Ben Lowe says:
Hi Shyam, Which particular feature are you referring to? There is a small bug if you are wanting to use the embed for an activity. You need to open the activity details page once without being logged in (so use a different browser that isn’t connected to Strava) so it can populate the public data streams. After that, the embed should work.
Shyam Suyambu says:
Hi Ben, I’m referring to the page that lets a user create a 3d/2d profile from a GPX route, i.e., a route not ridden yet (hence not on Strava.)
Many thanks!
Ben Lowe says:
I’m sorry, I was answering your comment in the WordPress admin page that didn’t show the thread! I’ve updated that reply above from 2015 as it was way out of date. Hopefully that answers your question.
athlete/381555 says:
Super! Thanks, I must have missed that one.
P.S. I cannot leave a reply here without filling out a website (maybe you checked a box with “required”)
Andy Loughran says:
I can’t seem to find an embed button any more – can you point out where this should be?
Ben says:
Top right of 3D view but not currently available on Activity’s 3D view.
Roo Reynolds says:
Looks like ’embed’ option only shows up for segments (not for activities) at the moment?
Alessandro says:
Why I can’t see “Embed” button in 3D Profile? Only “Get Image” is showed. Thanks
David bolton says:
Hi, is it possible to output these files to a 3d drawing file so I can 3d print them?
Ben Lowe says:
Not currently I’m afraid. If you are able to email me with some details of what sort of export would be required then I can certainly look into it.
Worlds Okayest says:
Im thinking the same thing. Would love to export the 3d file so I can print up a little something for my desk when I am stuck inside. Is this possible at all?
Andrew Short says:
Ben, if I got you the file type requirements for an export that could be used in a CAD system, would this still be possible for you to do?
Andrew Short says:
Ben,
the file types that would work would be a Step file (.stp) or a Parasolid (.x_t) file. are the possible?
Ben Lowe says:
Hi Andrew, If you’re able to provide me some robust pseudo-code (or better still JavaScript) to convert a lat/lng/elev array to the format you need then I’d happily integrate it.
Ben Palmer says:
Hi Ben,
Why would some segments on a ride not get picked up? For example, I have 5 starred segments in Strava for a particular route, but VeloViewer only picks up two of the segments.
These are the segments on Strava:
‘Viento’ – https://www.strava.com/segments/19790474
‘Agua’ – https://www.strava.com/segments/19790480
‘Tierra’ – https://www.strava.com/segments/19790491
‘Fuego’ – https://www.strava.com/segments/19790496
‘Cinco’ – https://www.strava.com/segments/19790502
Thanks, Ben
MarcoPolo says:
Hi Ben,
Is there a way to embed monthly wheel infographic? It would be cool to be able to include interactive original version into blog posts instead of screednshots.
Cheers, Mark
Ben Lowe says:
Hmmm, not had that request before. I’m not sure it’ll work that well as an embed as they need to be responsive and reduce in size on smaller devices will always makes the wheel get too messy. Probably neater and more consistent to just use a screenshot of this one.
Sven says:
Hi there,
I love Veloviewer! Is it possible to print my rides during a specific interval in the wheel-form (so the map) onto a canvas?
Thanks,
Sven
Ben Lowe says:
Hi Sven. You can use the filters to pick the start/end dates, if you need more flexibility then use the filters on the Activities page to refine the list to just the ones you want and then scroll to the bottom of the list and click the “View in Wheel” button. Because it is using a map with 3rd party (i.e. from a different domain) map images there is no way to automatically generate a static image in the code itself, so you would need to grab a screenshot of the Wheel which you would then print. My recommendation would be to do that on a device with a massive screen. e.g. a Mac or PC with double density retina type display as the number of pixels in the image will be 4x as many resulting in a much better image for printing.