 The VeloViewer Explorer Tiles and more specifically the Explorer Max Square has acquired a bit of a cult following since its introduction to the site back in March 2015 despite me not having fully explaining what it is all about until now! The Explorer Score rewards those people who explore new roads/trails rather doing the same old loops. Providing non-performance based motivations has always been one of the main goals of VeloViewer and this one really looks to tick that box.
New VeloViewer Explorer Tile features since this post:
- Introducing the Explorer Cluster
- Veloviewer Explorer Tiles – Global Heatmap
- VeloViewer Chrome Extension for Strava Website
- Explorer Tile Calculation Updates
- Meet the Explorers
Explorer Tiles
The explorer tile total is how many squares you have passed through from all of your activities of whatever type (i.e. Ride, Run etc). The squares themselves are based around the standard OpenStreetMap map tile 256x256px image at a zoom level of 14. If any of your activities cross into a tile then it gets a tick.
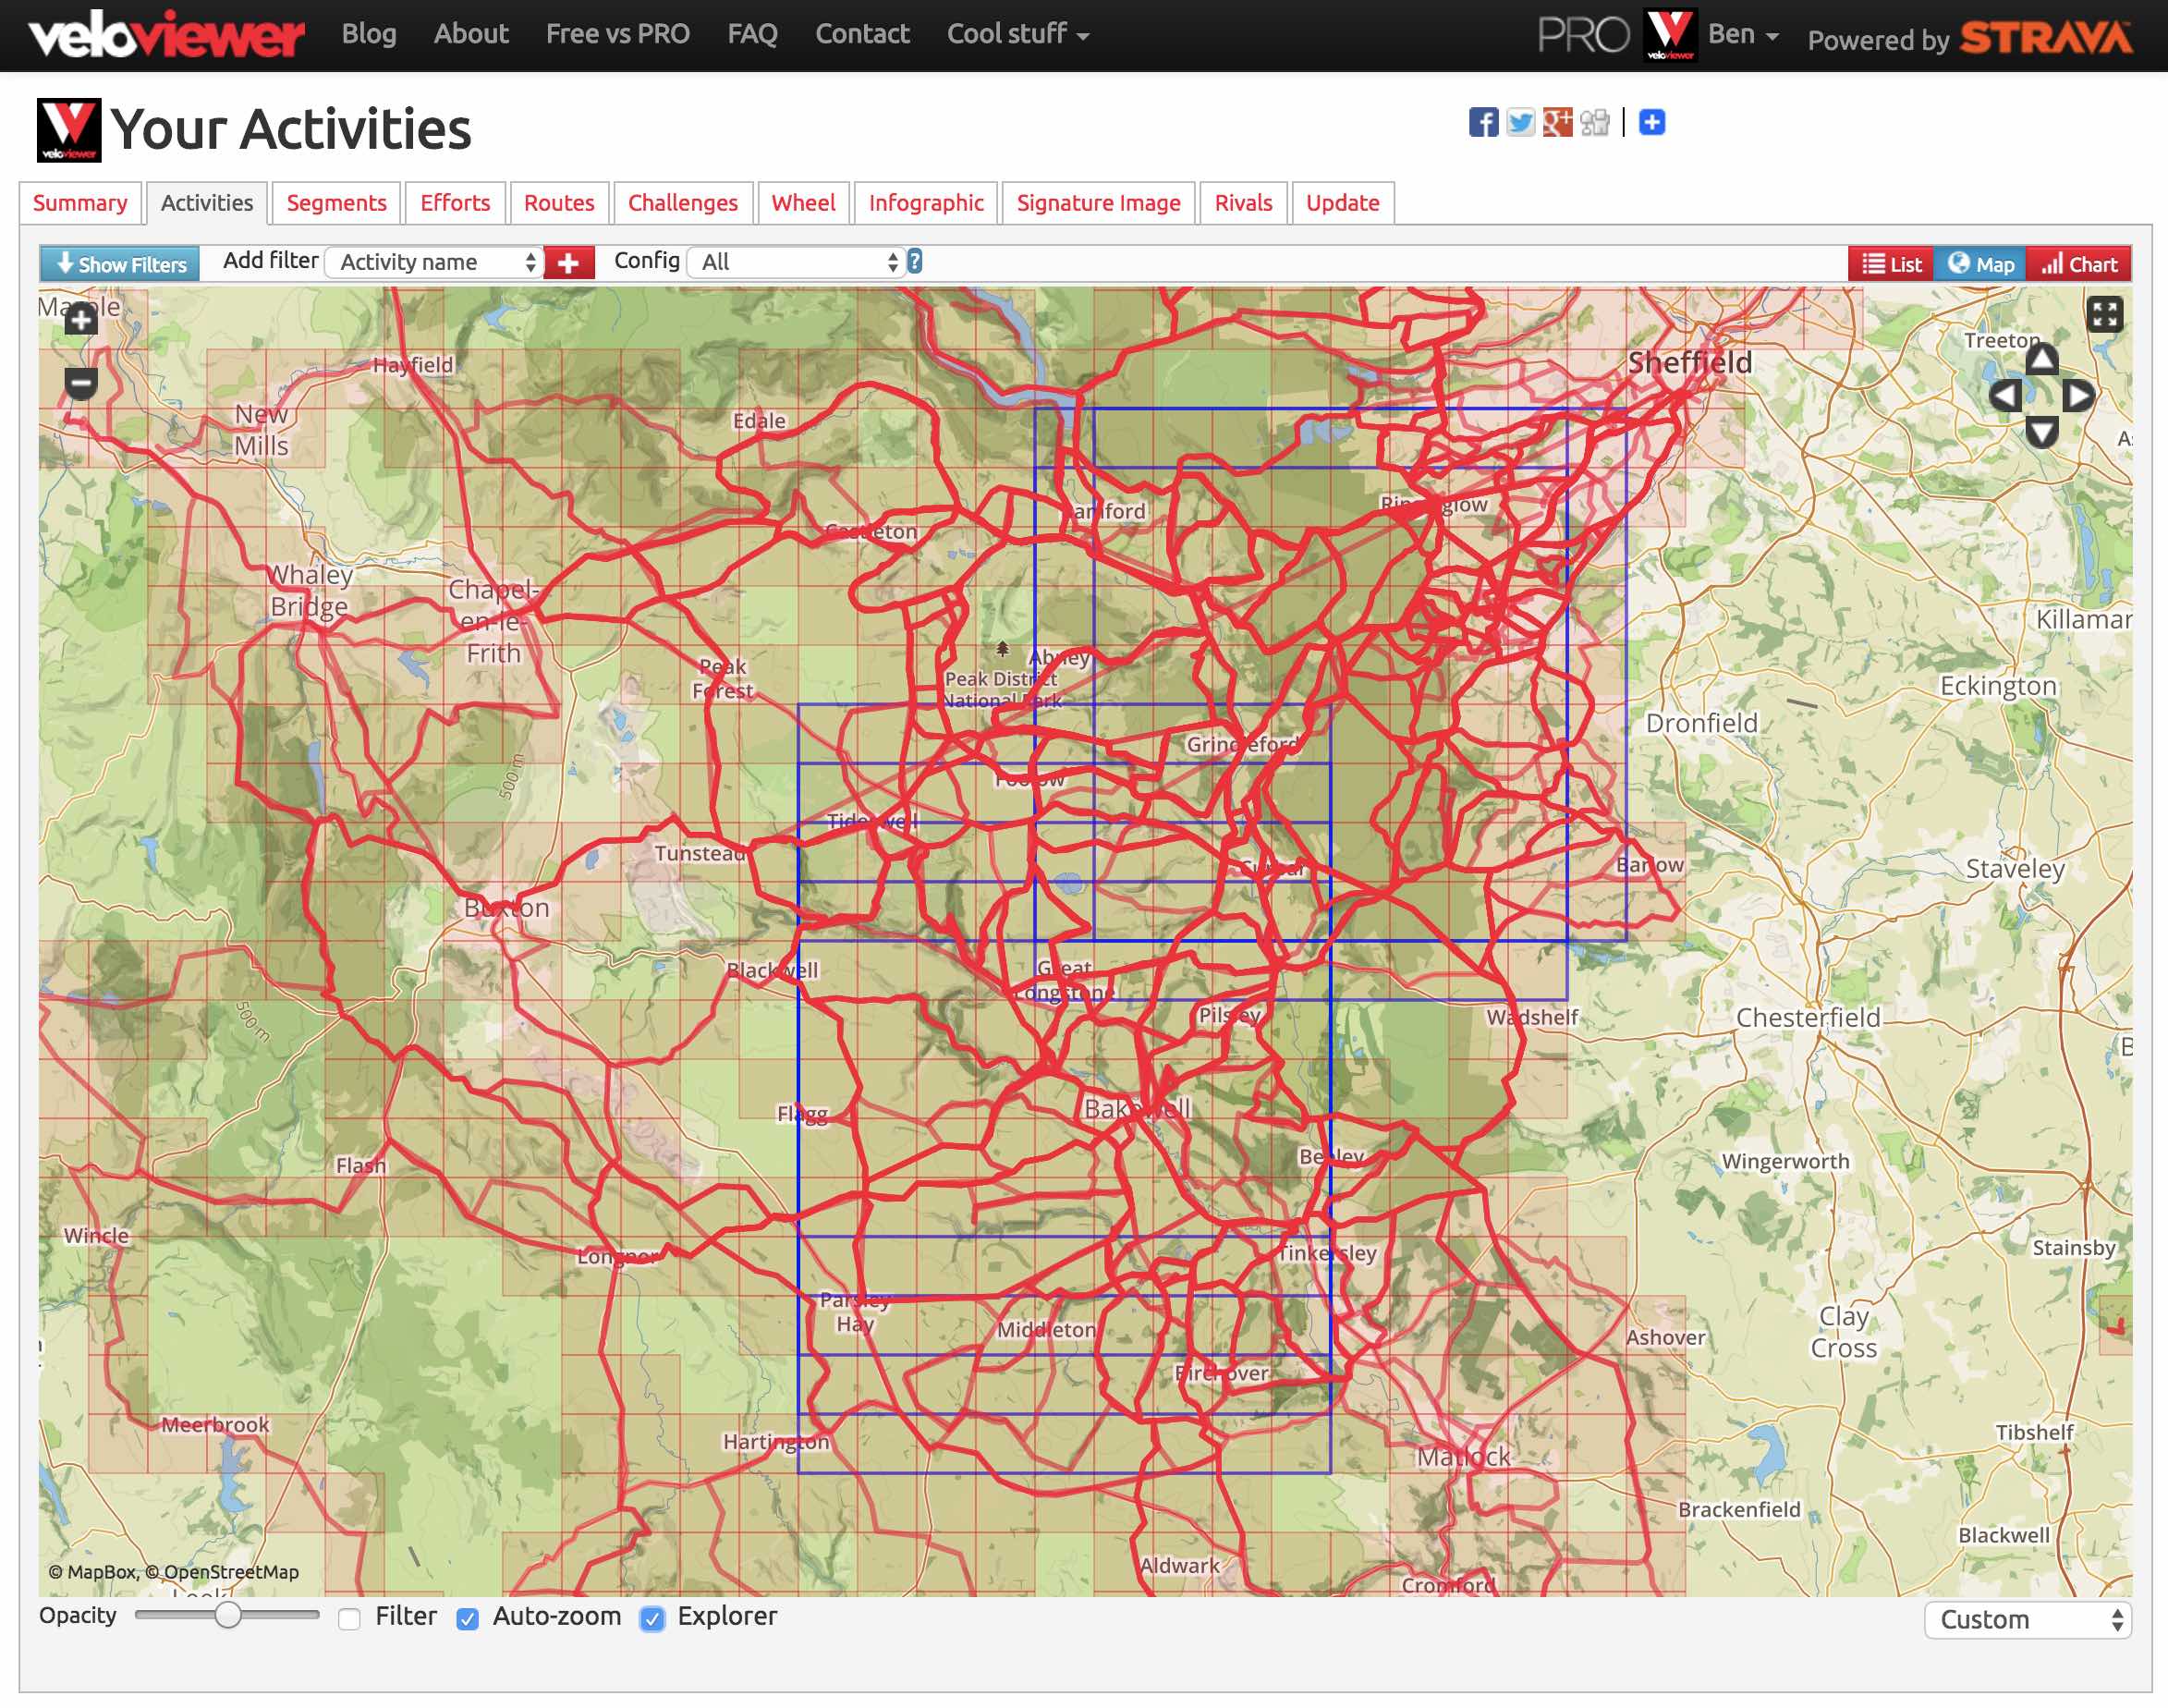
On your activities tab if you turn on the map view (toggle buttons in the top right) and then turn on the Explorer option below the map you’ll see all of your completed tiles:
Max Square
Here’s the real challenge: how big a complete square of tiles can you tick off? You’ll see those shown with a blue square on the Activities’ map. For me I have a fairly measly max square of 9×9. As you can see in the image above I actually have 7 different 9×9 squares shown. Should I expand one of those to 10×10 then I’d just see the one blue square.
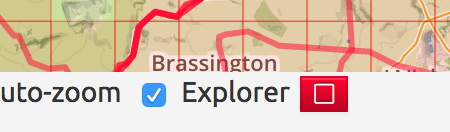
A new button is now available next to the Explorer toggle below the map that auto-zooms your map view to your max Explorer Square:
Your Explorer Stats
Near the top of your Summary page you’ll see your current Explorer Tile count as well as max square size:
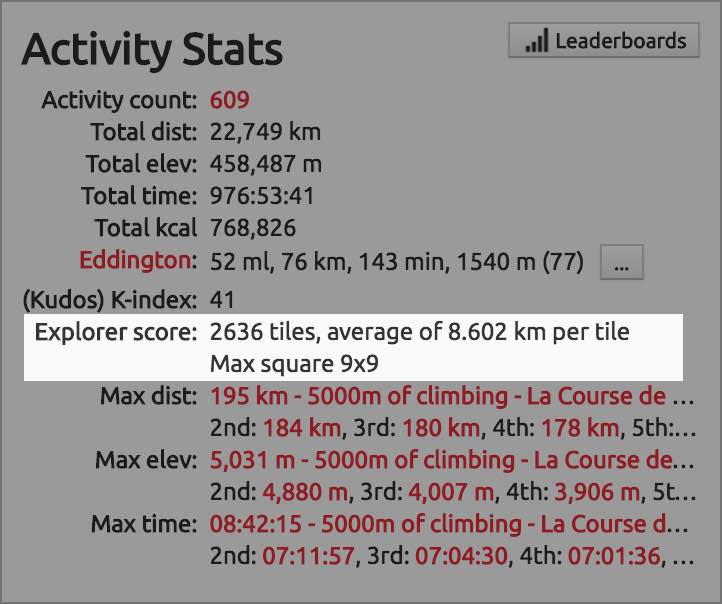
There is also the average distance travelled for each ticked tile (i.e. number of tiles / total distance).
These scores respond to any filters so you can view your current year’s Explorer stats or those for a certain activity type or set of bikes.
Viewing your Explorer progression
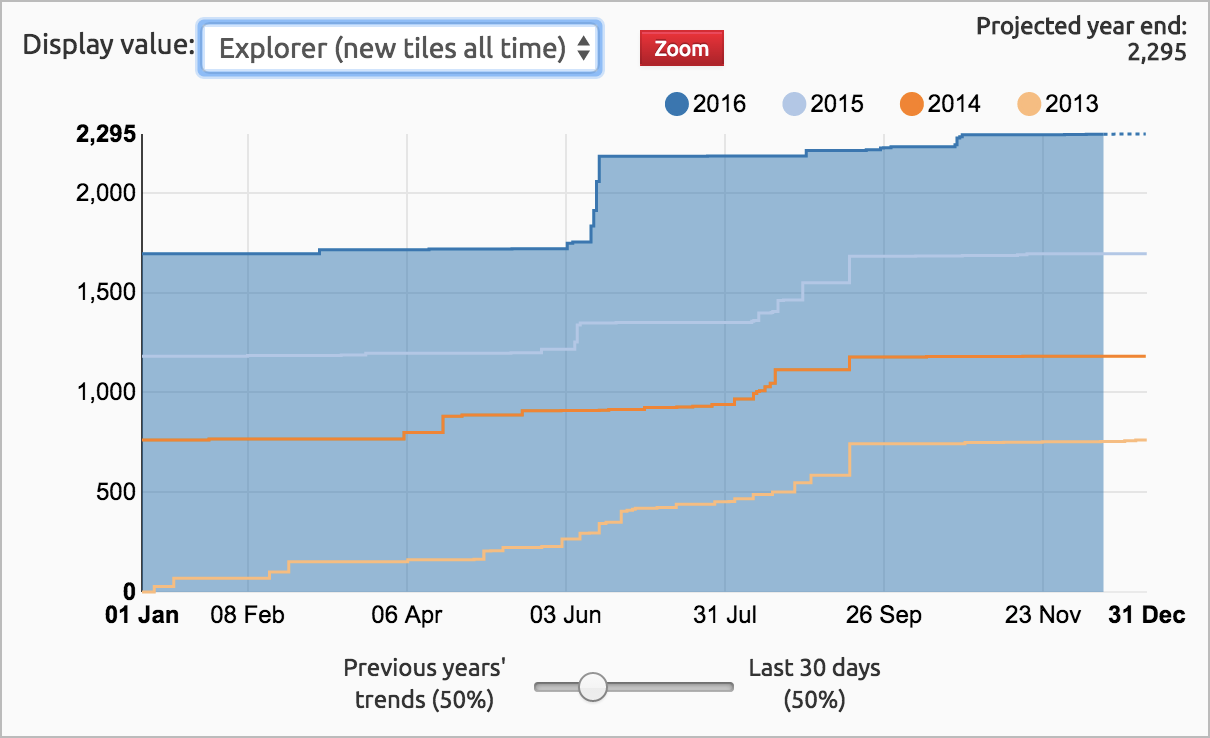
In the yearly comparison chart on your Summary page there is now the option to view “Explorer (new tiles all time)” which provides a really clear view on how your ticking off of tiles has progressed over the years. After an initial trickle of new tiles in the first year often the main, large spikes are the result of holidays to new places. Of course, Virtual Rides don’t count!
There are also the options to view “Explorer (all tiles)” (i.e. a count of all the tiles covered in an activity whether they have been visited before or not) in all three charts along with an “Explorer (new tiles by year)” option in the yearly comparison chart.
How do your explorations compare to others?
Clicking the “Leaderboards” button on your summary page (shown in the previous image) allows you to view the all-time leaderboard for Explorer Max Square which is the pinnacle of the Explorer world:

At the time of writing, a square of 58×58 tiles is your target!
So what sort of dedication does it take to make the top 10? Well, a glimpse into this world was revealed recently in the comments section of one of Nils’ rides by a number of those featuring in the top 10.
This from Eric Nichols (the highest placed non-European):
“I’ve had to carry my bike through swamps, hike shorelines at low tide, kayak across estuaries, not to mention skiing and hiking otherwise inaccessible areas. I’ve attempted to enter military installations, only to be turned away at gunpoint! Currently hoping for a cold winter so I can ride across a frozen lake on my studded fatbike…”
Read the full comments thread for more explorer craziness.
So I don’t want to hear those excuses about a lack of roads halting your progress!
Help building routes
I recently released a new Google Chrome Extension that provides handy additions to the main Strava website like providing deep links back to VeloViewer from segments, routes and activities. But it also provides an additional layer in the Strava Route Builder to show explorer tiles colouring in those which you’ve completed along with your current max square(s):
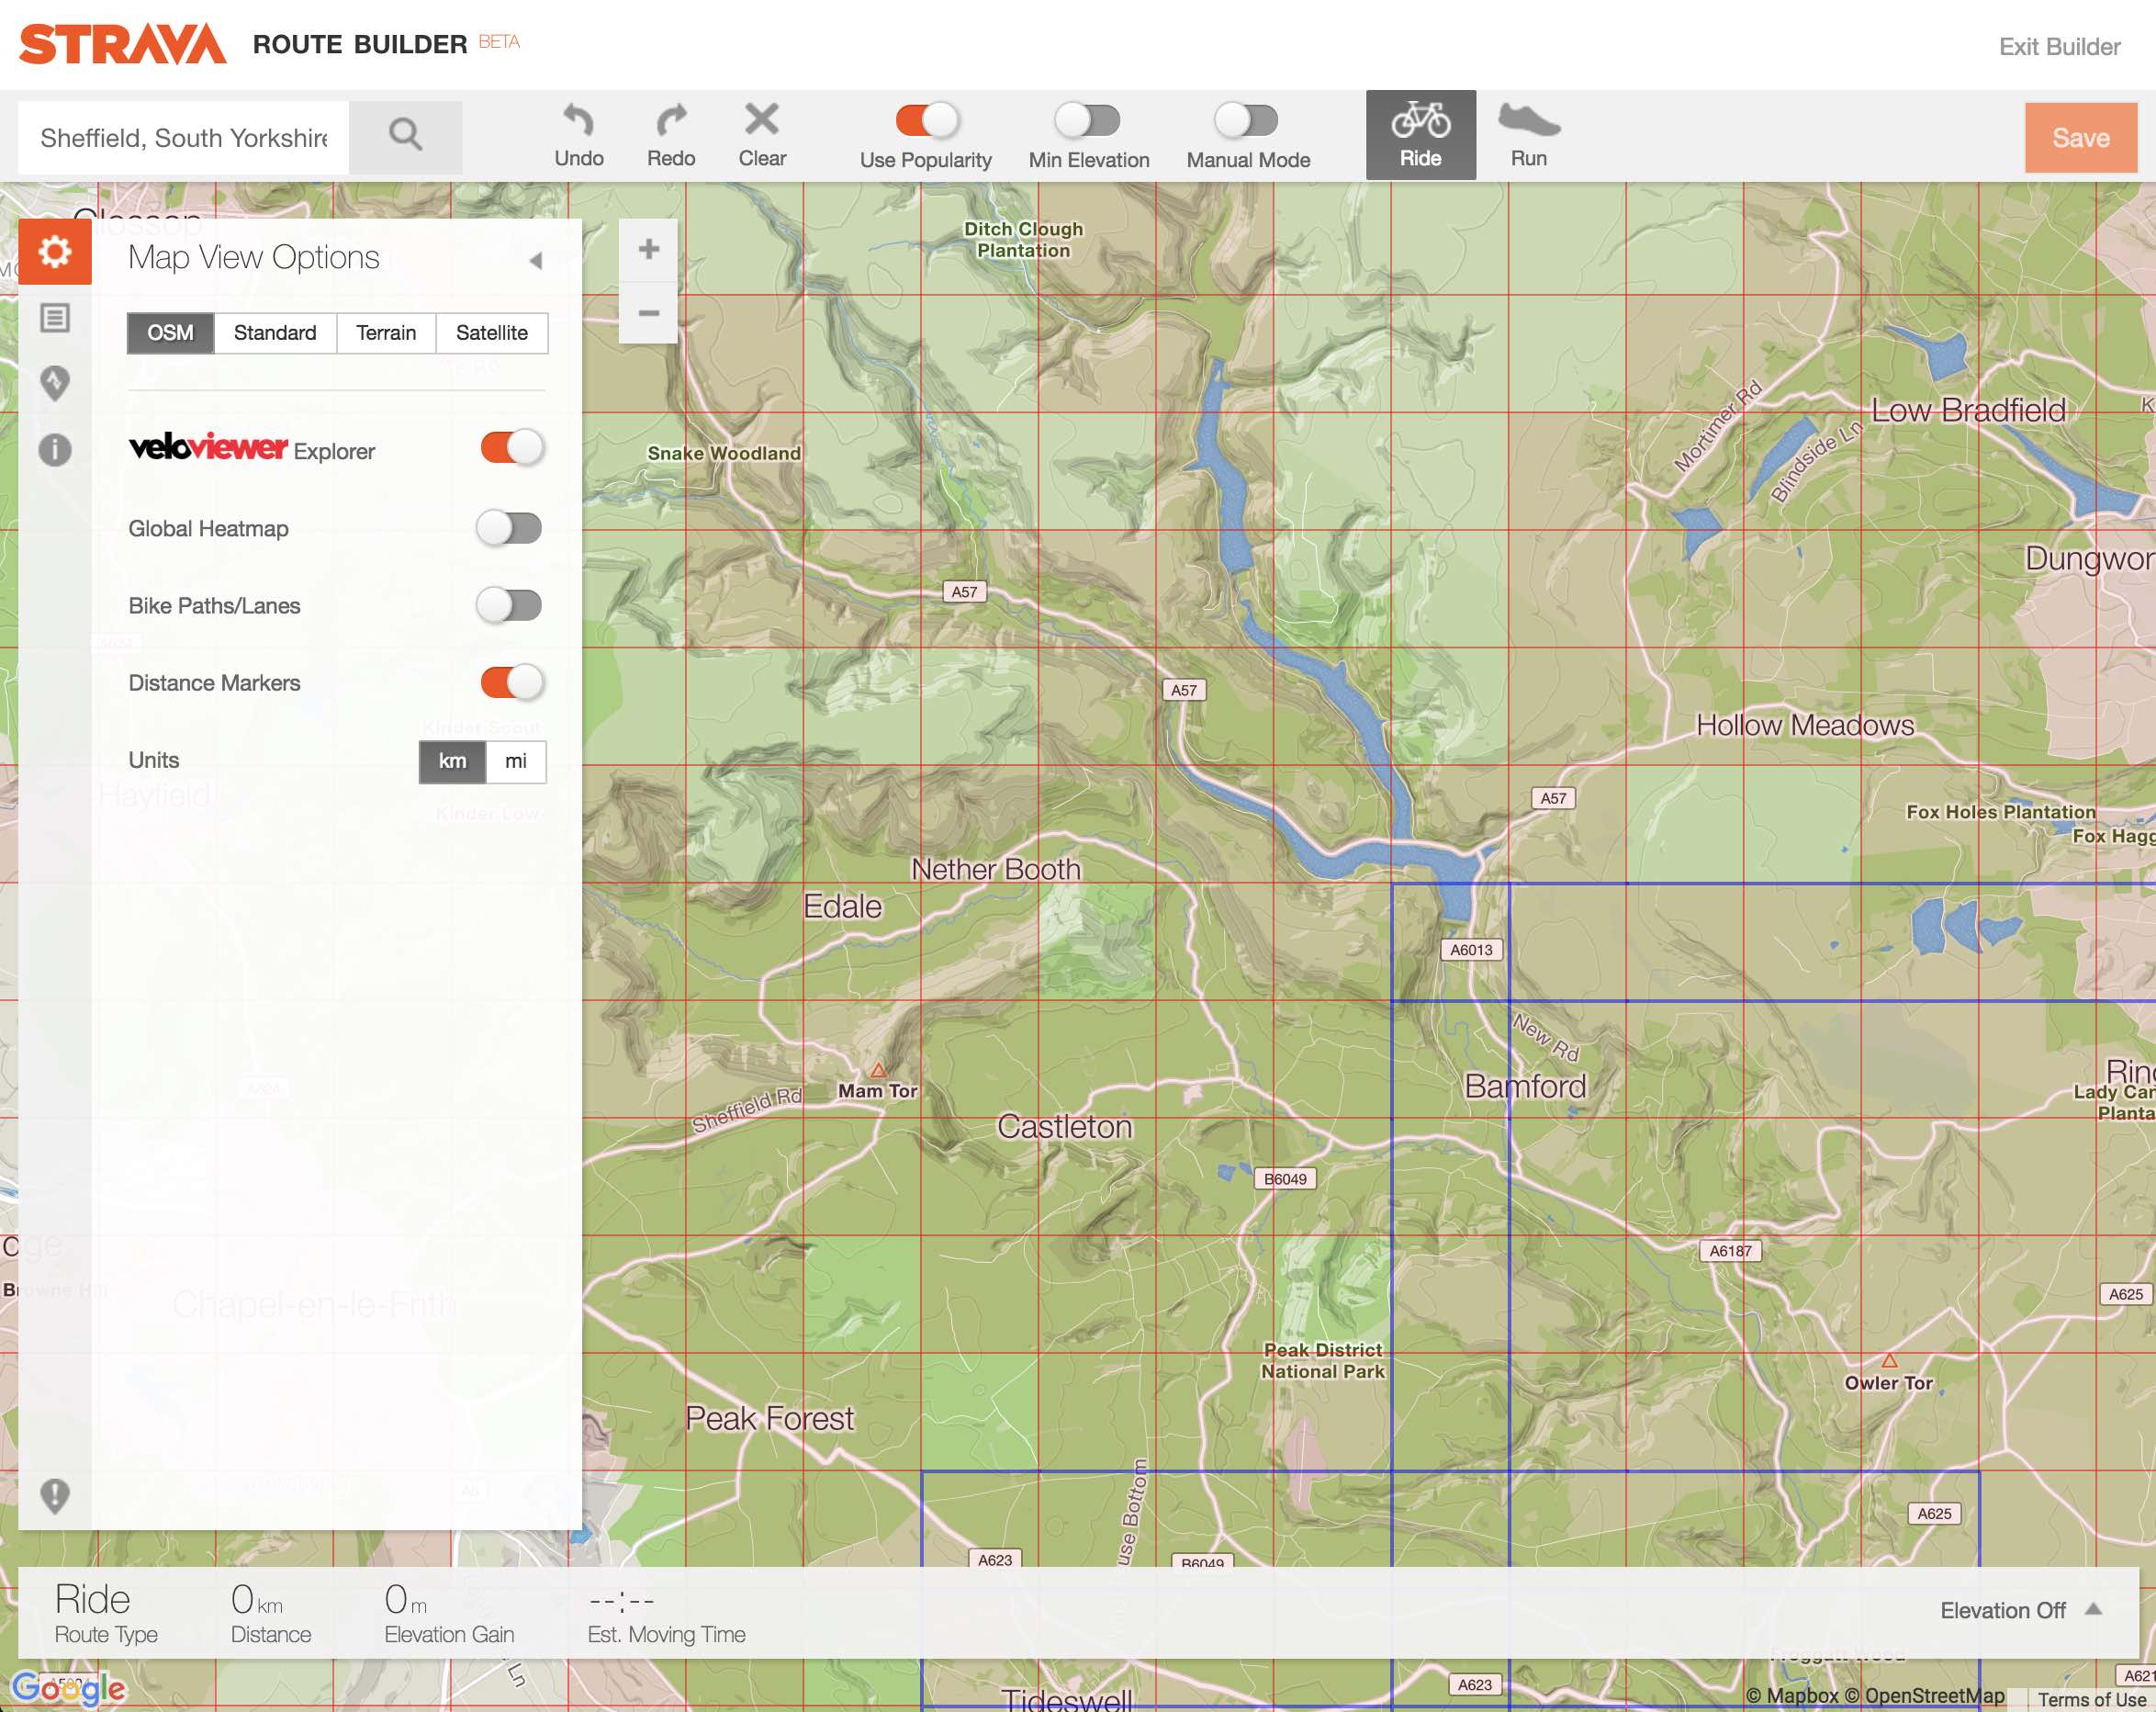
Install the extension from here and then toggle the “VeloViewer Explorer” option when creating or editing a Route to view.
Missed Tiles
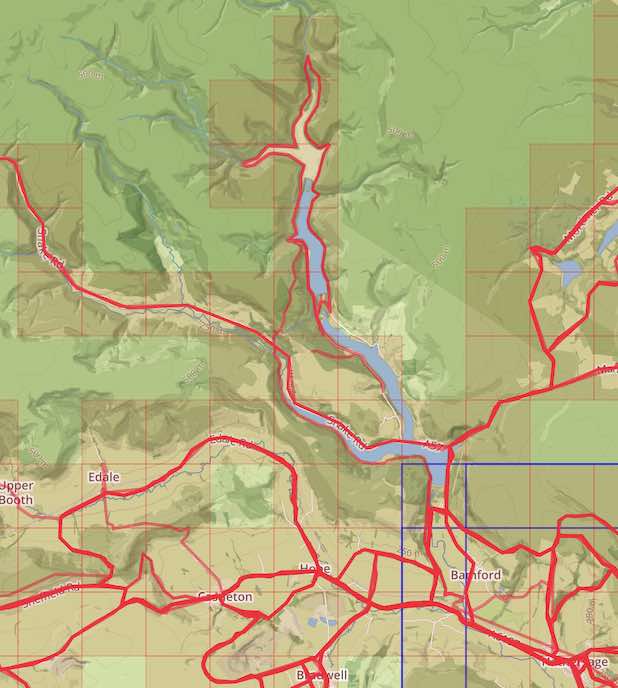
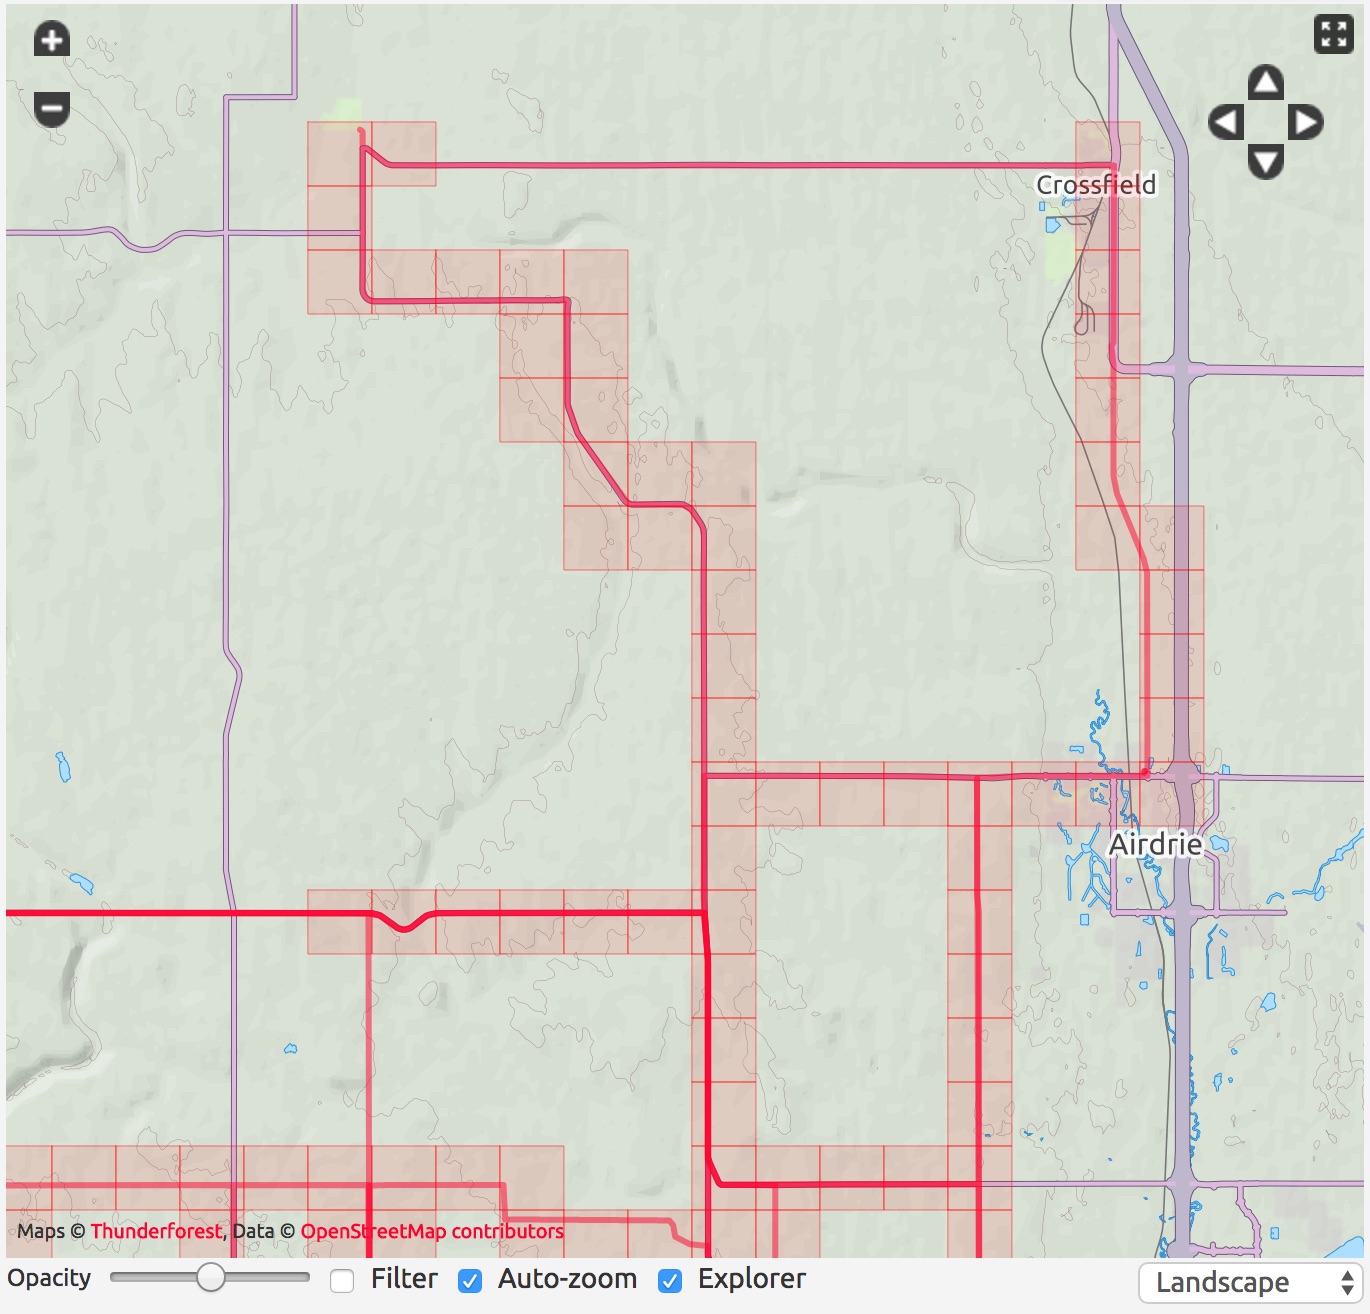
Some of you that ride very straight roads might notice that at times some tiles fail to become marked as completed. This is because the calculation uses each activity’s summary map line which is a very much simplified set of points than the full route. The algorithm does its best to fill in blanks where possible but these long, straight lines on an Activity can also be caused by GPS errors and where people forget to restart their GPS device. But now there is a way to force these missed tiles to be marked by simply opening the offending Activity’s Details page. This will result in the explorer tiles being calculated using all of the data points recorded by the GPS device.
So it will go from this:
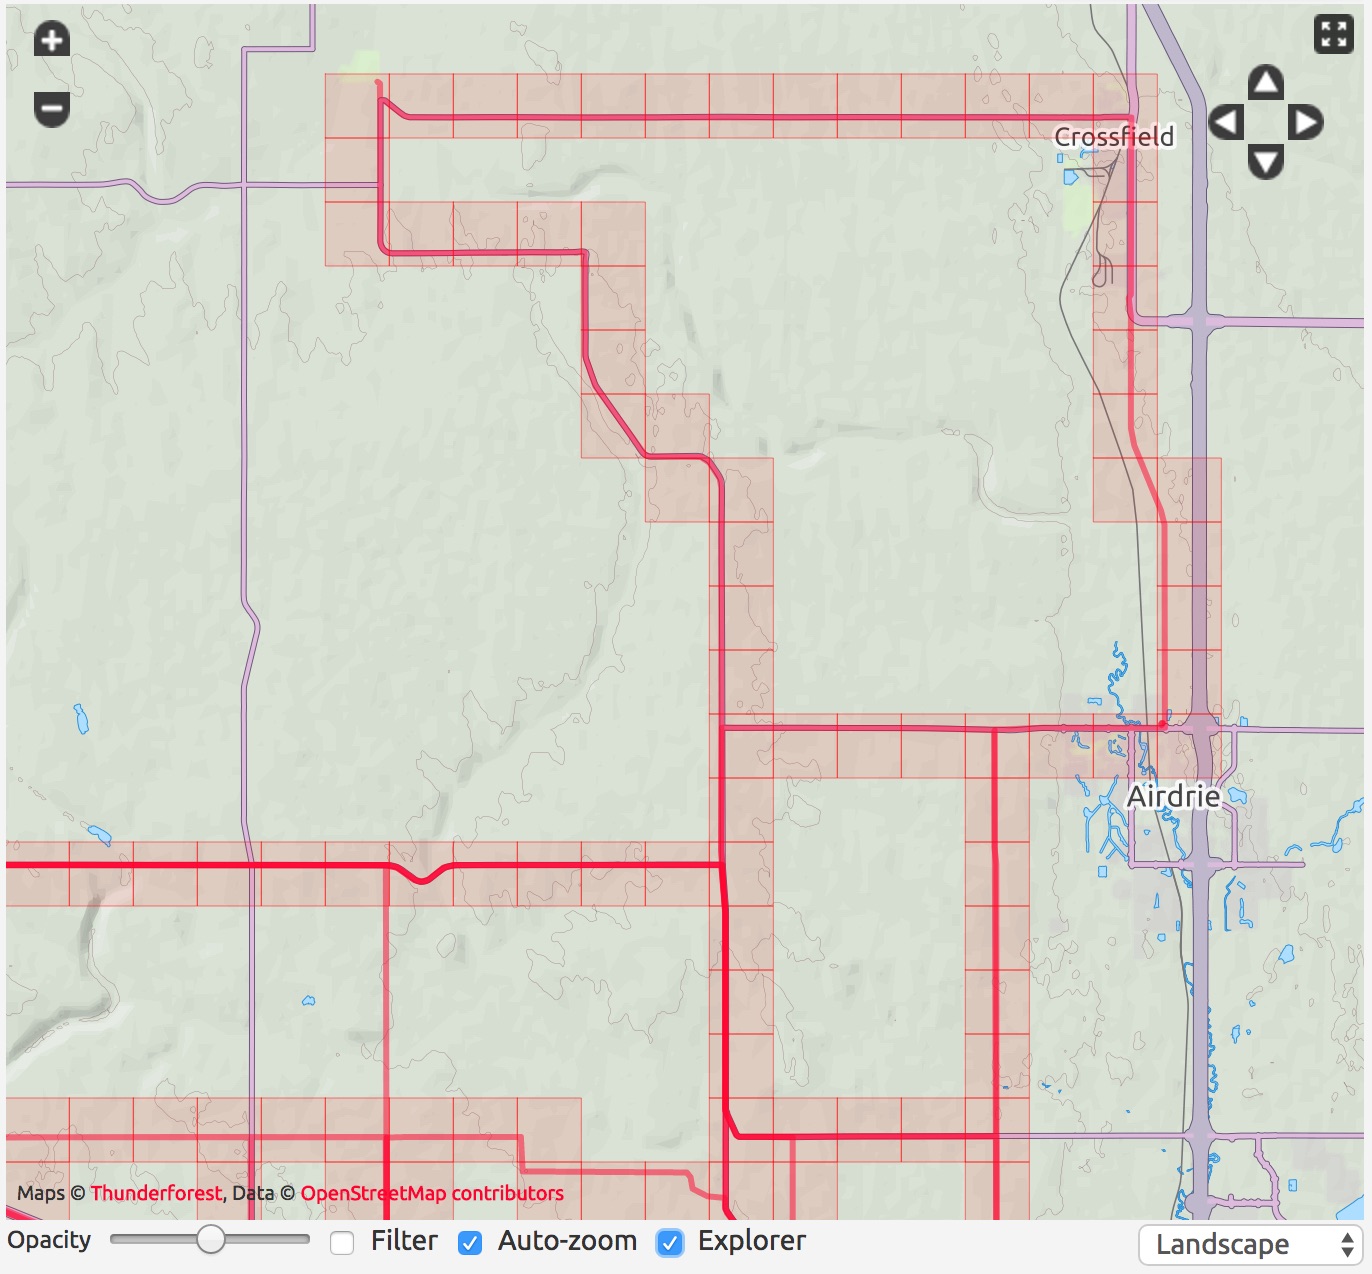
To this:
Other Notes
- The actual km size of each tile does vary slightly based on the latitude with the tiles being smaller the closer to the poles you are but I’m sure the weather at those latitudes more than make up for the advantage!
- The simplified activity lines (as seen on the Activities page map) are used rather than the full activity lat/lng stream for performance reasons.
- For the activities using the simplified activity lines, any straight line >500m in length will not tick any map tiles (to attempt to stop the counting of tiles where people have forgotten to restart their GPS devices and get a big jump when remembering to restart). If you have any activities missing tiles because of this then please open the activity’s details page to populate its full list of tiles.
- VeloViewer takes no responsibility should you get injured or arrested attempting to tick explorer tiles!
Andrew Bottrill says:
As well as the total number of tiles and Max square, the largest number of connected tiles would be quite interesting.
Eric Nichols says:
Thanks Ben! I wondered about the 100m “tolerance”, thanks for the explanation.
David Phillips says:
I can not use the explorer extension on strava. I get a funny little “no entry” sign when I hover over the “Veloviewer explorer” switch. Premium user and constantly in awe of your fantastic work.
Ben Lowe says:
Hi David, Can you email me a screenshot of what you are seeing so I can understand the context?
Update – that was my fault, introduced a bug which is now fixed.
Tim James says:
Same issue here, no entry sign when trying to enable Veloviewer Explorer toggle in the Strava Route Builder / Map View Options – your screenshot shows what it looks like when enabled but I can’t enable it as the toggle is not clickable.
Ben Lowe says:
My fault, found/fixed a bug I’d introduced. If you visit your Summary page now it should populate the necessary file in the background to allow the Route Builder tile view to display.
Ben Lowe says:
My fault, found/fixed a bug I’d introduced. If you visit your Summary page now it should populate the necessary file in the background to allow the Route Builder tile view to display.
Tim James says:
Nice work, fixed now…and it’s inspired me to create my first strava route. Thanks!
Arkadiusz Reclaw says:
For me Explorer is the greatest thing in all gps-devices-fun-world! I know Explorer from 10 months, since than I bred my max square (Warsaw area) from 13 to 20. Bid dose of adventures! Big thanks for that! You produce a lot of someones happiness 🙂 I need to grow my max square more to get into top20, but what was my suprise that I’m 3rd in “Explorer Score” with 24 594 tiles 🙂
Ben Lowe says:
Great to hear. Hopefully it will provide plenty more adventures next year too.
Gary Milligan says:
My max square is 8 (I’m a runner!) yet on the leaderboard it says value:4
Ben Lowe says:
Hi Gary. Could you email me a link to your Summary page and I’ll take a look at why that could be happening? Thanks, Ben.
José Peixoto says:
Hi David , Would be very cool a ranking with the cyclists who accumulated more distance in the segments, a kind of “segment mouse” ..;)
Dai says:
Absolutely love this, a whole new way of looking at ride planning. Today I discovered a new road and in one tile upped my 7×7 square to a 9×9, I only need 3 more for 11×11 and in this part of the world I think 13×13 may be possible but beyond that a mountain bike and serious amounts of off road and trespassing would be required (or swimming) 🙂
Thanks again Ben.
Dominic Watts says:
I might be missing something here but is there an explorer score per activity that is easily accessible on the list?
Ben Lowe says:
Not really as it is more about ticking previously unridden tiles rather than the total number of tiles otherwise it probably just replicates the distance covered. It’s more of a long game!
Ben Lowe says:
I’ve added a new “Viewing your Explorer progression” section Dom that might well answer your question better.
John S says:
Thanks for this Ben. I didn’t know about explorer until yesterday. I’ll never get a KOM, but I like riding new roads, so it’s right up my rue. I had a glance at the 2016 leaderboard and was gobsmacked to see myself at the top. Riding across smaller tiles in the north of Norway may have helped my score.
Now planning to improve on my frankly pathetic 8×8 max square score.
Charles Leonard says:
Hi, is there any other way of seeing the grid? – I’m using mobile devices, so the chrome extension does not appear to be an option. I’m interested in planning ahead for my summer holiday to see if I can improve on my current best swim square of 3×3.
Ben Lowe says:
Just on the Activities List page on the main website. That displays fine on my iPhone.
Charles Leonard says:
Thanks. Not sure if I was clear – would it be possible to add the full grid in the activities map view, i.e. including non-visited squares, to help in planning when looking at previously unvisited territory.
Ben Lowe says:
ah, OK. Probably best to use the Chrome Extension – https://newblog.veloviewer.com/veloviewer-chrome-extension-for-strava-website/ The Activities map is struggling performance wise for some users that have heaps of activities. Adding in more lines will just slow it down even more.
Chris Moor says:
Did the earth move ? The explorer squares seem to have shifted slightly – but just enough for a gap to appear (just north of Burbage Bridge).
Just wondering where the starting point for the squares is ?
Ben Lowe says:
The tile positions are the same, I have made a tweak to remove the 100m buffer previously used in the calculation. Check out Facebook for more info (https://www.facebook.com/VeloViewer/posts/1149588951813865 and then https://www.facebook.com/VeloViewer/photos/a.315075908598511.64804.309611395811629/1151331084972985/?type=3&theater). I’ll put out a blog post shortly that sums up all of the changes now I’ve done a couple of refinements.
Chris Roy says:
All my missing tiles filled in, awesome thanks.
Oh no Max Square tile alignment minor shift. Just lost two squares and max square has dropped one dimension. Time to get out on the road!!!!!
Ben Lowe says:
Please see my recent reply to Chris Moor…
Sebastian Czapnik says:
Has the size of the tile changed in the meantime? The leaders used to have 60+ squares, now above 30?
Ben Lowe says:
Yep, see https://newblog.veloviewer.com/explorer-tile-calculation-updates/ The updated accuracy of the calculation has inevitably resulted in a few tiles that were in some of the previous max squares are now unticked. Those at the top of the leaderboard are no busy ticking off those missing tiles and will soon be back to their original totals.
Johan Barelds says:
Hi Ben! Only recent we discovered the joys of Explorer tiles :-). Big fun for me and my cycling mates. Thanks! Question: What happens to the Max Square if you are stuck between water? (e.g. see and wide canal). Can the square expand over the canal not taking the water tiles into account? Thanks for your great work and reply! Gr. Johan
Ben Lowe says:
Nope, a square must include all tiles, but… because of people having inaccessible squares (usually military bases as water can be ticked off in kayaks etc) the idea of a Max Cluster was created – https://newblog.veloviewer.com/introducing-the-explorer-cluster-and-configurable-explorer-visuals/
Russell Carson says:
There is a route showing on my map, that is made up of a series of long straight lines – not following the road that I cycled. When I click on the offending route, The activity map follows the road as I would expect. Is there a fix for this? It’s causing tiles to be coloured, that I haven’t visited yet, due to the straight lines.
Ben Lowe says:
Yep, see #13 on the FAQ – https://newblog.veloviewer.com/faq/
If you’re still having an issue then email me with a link to the activity that you’re having trouble with.
Craig Herd says:
Hi Ben,
Is it possible to filter max square and max cluster leader boards by Strava club?
Ben Lowe says:
Yeah, for sure. Just head to the Clubs tab on the leaderboards popup when viewing by one of the Explorer scores. Of course your club-mates will need to be on VeloViewer to show up though.
Martin says:
I know it’s an explorer square, but does it have to be? Could you make a rectangle too? My square is at 14×14. My rectangle would be something like 14 X 20.
Ben Lowe says:
Yep, for purities sake it is a square. However if your local geography makes a square tricky then check out the Max Cluster instead – https://newblog.veloviewer.com/introducing-the-explorer-cluster-and-configurable-explorer-visuals/
Pedro Fen says:
I can get something daft like 14 rather easily if I could get security clearance to get into the port. You can see my attempt to bag the square yesterday, but was stymied by a rather large man and an even larger fence.
By the way! The best essay writing service – https://www.easyessay.pro/
And Happy New Year!
Chris Fearnley says:
Can you explain about different types of activities? I see only rides / runs in the list; is it possible to include water-based activities e.g. kayaking? I have some kayak activities in Strava but they’re not reproduced in VV. Some comments in forums suggest people have included kayak trips – have they changed the activity type in Strava to acheive this?
Thanks
Chris Fearnley says:
OK, found out how to do this now, having read halfway through the 28-page thread on yacf! It’s on the update/options section.
Peter Block says:
Filtering by year in the Chrome extension would be very helpful to plan routes for missing tiles by the current year.
Ben Lowe says:
Currently the ticked explorer tiles are stored and passed to the route builder as a single file that is just the list of tiles. It would need a huge amount more data to be passed around to be able to apply filtering in that way.
Ton Kuipers says:
“If you have any activities missing tiles because of this then please open the activity’s details page to populate its full list of tiles.”
Is this feature only accessible in the pro version? Or else where can i find it?
Ben Lowe says:
The free version allows you to bring across 25 activities to try out all of the features of the site, including viewing the activity details of those 25 activities. You would need to upgrade to PRO to bring in all of your newer activities after that point along with the rest of your Strava history. So yes, you need to be PRO in order to use the Explorer functionality fully.
Jan D says:
I really like this feature since it encourages me to explore new areas and discover new places and roads. There is also the element of competition to go for the largest square. But this is something where I see an issue and that is that not every square is accessible. E.g. I live close to a military training site that spans 5 squares and cannot be added. Would it possible to investigate a feature that would provide squares with low access rates once you have all the surrounding squares?
Ben Lowe says:
Hi Jan. I put this scenario out to the Explorer community a number of years ago in order to see what the consensus would be about the best way to deal with this and the result was that hard to get tiles should be left as they are and the Max Cluster was created as an alternative for people who have these tricky tiles.
Discussion: https://www.strava.com/clubs/279168/posts/582450
Cluster info: https://newblog.veloviewer.com/introducing-the-explorer-cluster-and-configurable-explorer-visuals/
Tricky to tick tiles are the best part for some explorers as they have to find ingenious ways to tick them off. Military base open days or sporting events held on their grounds. that sort of thing. Asking for suggestions in the Ride Every Tile Strava club is the best approach: https://www.strava.com/clubs/279168/discussion